Why Is My Resin Sticky or Soft? Troubleshooting Guide
Discover the most common reasons your epoxy resin stays sticky, tacky, or soft after curing — and learn step-by-step fixes for each cause, including when to re-coat and when to start over.
I’ve been there. You followed the instructions, waited patiently (or impatiently — I won’t judge), peeled the piece out of the mold, and… it’s still sticky. Maybe tacky all over, maybe soft in the middle, maybe there are random gummy patches on an otherwise hard surface. It’s one of the most deflating moments in resin crafting, and I can tell you from personal experience — it happens to everyone at least once.
The first time it happened to me was a set of four coasters I was making as a birthday gift. Three cured perfectly. The fourth was tacky on the surface and soft underneath. Same batch, same conditions, same mold. What went wrong? It took me an embarrassingly long time to figure out: I hadn’t scraped the bottom of my mixing cup. The fourth coaster got the last pour from the cup — which was mostly unmixed resin that had been sitting in the corners.
The good news is that sticky resin almost always has a specific, diagnosable cause. Once you know what went wrong, you can either fix the piece or avoid the mistake next time.
Understanding Why Resin Gets Sticky
Before we get into the individual causes, it helps to understand what’s actually happening at a chemical level — because it’s the same thing regardless of what caused it.
Epoxy resin cures through a chemical reaction between two components: the resin (Part A) and the hardener (Part B). When you mix them in the correct ratio, every molecule of resin finds a corresponding molecule of hardener, and they cross-link into a hard, durable polymer. It’s like molecular-level Lego — every piece snaps together.
Sticky resin means this reaction didn’t complete. There are unreacted molecules of either resin or hardener left behind, and they stay in their liquid or semi-liquid state. Permanently. The stickiness you feel? That’s literally uncured resin sitting on or within the surface. It’s not going to harden with more time (in most cases). It needs to be addressed.
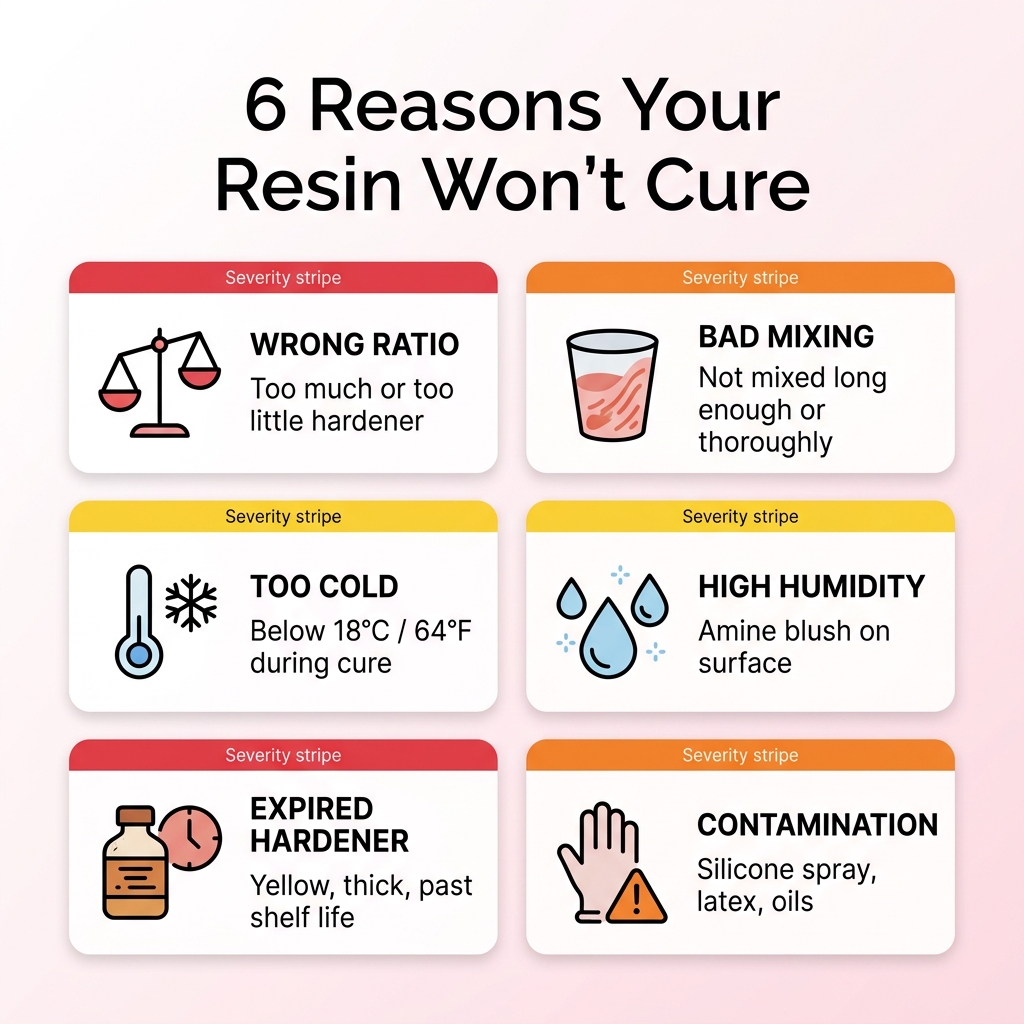
Cause 1: Incorrect Mixing Ratio
This is the most common cause of sticky resin, and unfortunately, it’s also the hardest to fix because the error happened before you even poured.
What Goes Wrong
Every resin product specifies a mixing ratio — typically 1:1, 2:1, or 3:1 by volume. That ratio isn’t a rough guideline. It’s the exact chemical formula the manufacturer engineered for a complete reaction. If you add too much resin, there aren’t enough hardener molecules to react with all of it. Too much hardener, and the excess disrupts the cross-linking process.
Even a 5% to 10% error can cause problems, especially with 2:1 and 3:1 resins where the hardener volume is already small. I used to think “close enough” was fine. It’s not. I’ve had pieces come out soft from as little as a tablespoon of error on a 400ml batch.
How to Prevent It
- Measure with graduated cups or a digital scale — never eyeball it. I know it’s tempting. Don’t.
- Use our resin calculator to compute the exact Part A and Part B volumes before you mix. Enter your mold dimensions, select your ratio, and the calculator handles the math.
- Double-check which ratio your product uses. Some brands specify by volume, others by weight. These are not the same numbers and confusing them will ruin the pour.
Can You Fix It?
Usually no. If the entire piece is uniformly sticky because the ratio was off, the uncured molecules are distributed throughout the entire mass. Pouring a fresh coat on top won’t fix what’s happening underneath — the new layer will bond to the sticky surface and eventually lift or stay soft at the interface.
Verdict: Start over. Remove the resin from the mold, clean the mold thoroughly with isopropyl alcohol, and re-pour with correctly measured amounts. It stings, but it’s the only real solution.
Cause 2: Insufficient Mixing
You measured perfectly, but the resin is still sticky in spots? This was my coaster problem. The most likely explanation is that you didn’t mix long enough or thoroughly enough.
What Goes Wrong
When you combine resin and hardener, the two liquids need to become completely homogeneous — one uniform mixture with no pockets of pure resin or pure hardener anywhere. Every unmixed pocket will remain uncured. These show up as random sticky spots, soft patches, or cloudy streaks in an otherwise perfectly cured piece.
The three mixing mistakes I see constantly (and have made myself):
- Not scraping the sides and bottom of the cup. Unmixed resin clings to the walls of the mixing cup and gets poured into the mold without ever touching the hardener. This was exactly my coaster problem.
- Mixing too fast. Fast, aggressive stirring creates bubbles but doesn’t actually blend the liquids. The stir stick whips through the center while the edges stay unmixed. It feels productive but it’s not.
- Not mixing long enough. Most resins need 3 to 5 minutes of slow, deliberate stirring. I’ve watched beginners in workshops stop after 30 seconds because “it looks mixed.” It’s not mixed.
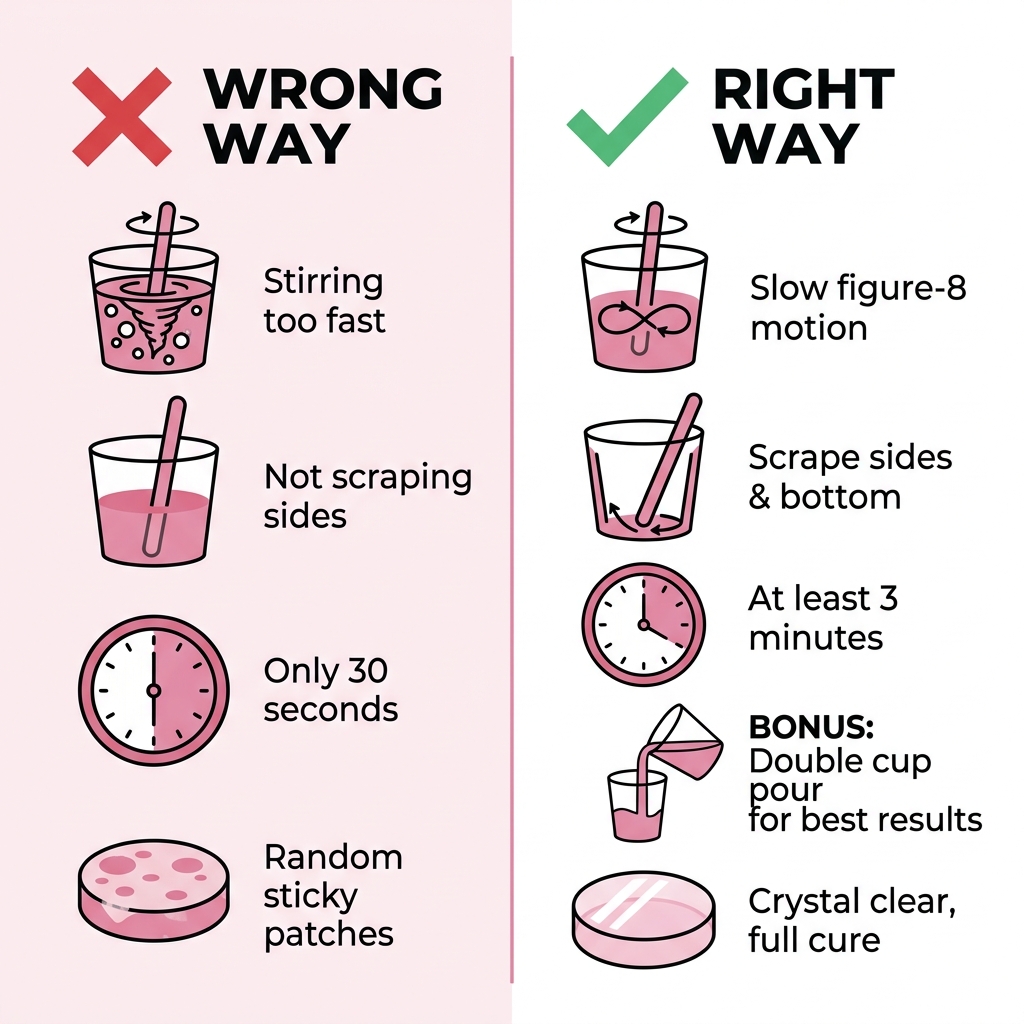
How to Prevent It
- Mix slowly in a figure-eight pattern for at least 3 full minutes. Set a timer if you need to — three minutes feels longer than you think.
- Scrape the bottom and sides of your mixing cup repeatedly during mixing. Get in those corners.
- Here’s a game-changer: pour the mixed resin into a second clean cup and mix again for 1 minute. This is called a double cup pour, and it catches any unmixed material left clinging to the walls of the first cup. I do this on every pour now and I haven’t had a sticky spot since.
Can You Fix It?
Sometimes. If the sticky spots are only on the surface, you can sand the cured areas lightly with 220-grit sandpaper to create mechanical adhesion, wipe clean with isopropyl alcohol, and pour a fresh thin coat over the top. The new coat must be correctly mixed (obviously).
If the sticky spots go deep into the piece — press on a cured area and check if the piece is soft underneath — then the fresh coat won’t help. The problem is internal. Start over.
Cause 3: Temperature Too Low
Cold rooms are a sneaky cause of cure failures because you might not even realize your workspace is too cold.
What Goes Wrong
Epoxy resins are formulated to cure within a specific temperature range, typically 22 °C to 26 °C (72 °F to 79 °F). As West System’s technical guide explains, a 10°C drop in temperature can roughly double the cure time. Drop below 18 °C (64 °F) and the reaction slows to the point where the resin may never fully cross-link. The result is a piece that might feel okay on a warm day but gets soft or tacky when the temperature drops.
I had this happen during a winter project. My workshop was in an unheated room and I didn’t bother checking the temperature. The coasters I poured that night felt hard the next day (the afternoon was warm), but by the following morning they were soft and slightly tacky again. The cure had never actually completed.
How to Prevent It
- Check your workspace temperature before mixing. A basic room thermometer costs a few dollars and saves you from guessing.
- In cold months, run a space heater to get the room to at least 22 °C. Keep it running for the first 24 hours of curing — that’s when the reaction needs warmth the most.
- Pre-warm your resin bottles in a warm water bath at about 30 °C for 10 minutes before mixing. Warm resin reacts more reliably and mixes more smoothly.
Can You Fix It?
Often yes — this is the most fixable cause. Move the piece to a consistently warm room (24 °C to 28 °C) and wait 48 to 72 hours. If the ratio was correct and the mixing was thorough, the warmth can restart and complete the cure. I’ve rescued several pieces this way. If it’s still sticky after 72 hours in a warm environment, the problem isn’t temperature alone — check the other causes.
Cause 4: High Humidity or Amine Blush
Humidity doesn’t usually prevent curing, but it causes a surface defect called amine blush that looks and feels a lot like sticky resin — which leads to a lot of misdiagnosis.
What Goes Wrong
When hardener molecules on the resin surface react with moisture and carbon dioxide in the air, they form a waxy, greasy film called amine blush. This film isn’t uncured resin — it’s a chemical byproduct of the hardener reacting with humid air instead of with the resin. But it feels sticky, looks cloudy, and prevents any new coat from bonding properly.
How to Identify It
Here’s the key difference: amine blush has a distinct waxy or oily feel, not the gummy tackiness of uncured resin. And — this is the test — you can often wipe it off with a damp cloth and warm water. If the surface underneath feels hard and properly cured, you’re dealing with amine blush, not a cure failure. That’s good news.
How to Prevent It
- Work in a space with humidity below 50% if possible. I check humidity with one of those cheap digital hygrometers before starting.
- Don’t use fans to speed up curing during the first few hours — they blow humid air across the surface and make the problem worse.
- Cover your piece with a clean container during the first 12 hours of curing. I flip a large plastic storage bin over mine. This creates a little microclimate with less air exchange.
How to Fix It
Wash the surface with warm soapy water and a soft cloth. Let it dry completely. Sand lightly with 320-grit sandpaper, wipe with isopropyl alcohol, and pour a fresh coat. Since amine blush is surface-only, the fix is straightforward and works reliably.
Cause 5: Expired or Improperly Stored Hardener
This is the cause that sneaks up on you after you’ve had your resin supplies for a while.
What Goes Wrong
Most epoxy hardeners have a shelf life of 6 to 12 months after opening. Over time, the reactive amine groups in the hardener react with moisture in the air — even inside a “sealed” bottle, there’s always some air in the headspace. Gradually, the hardener turns yellow, becomes thicker, and loses its ability to drive the cure to completion.
Extreme temperature swings during storage — hot garage in summer, cold garage in winter — accelerate this degradation significantly.
How to Identify It
Three telltale signs:
- The hardener looks yellow or amber instead of water-clear
- It’s thicker than usual or has crystallized chunks floating in it
- Every batch you mix comes out sticky, no matter how careful you are with the ratio and mixing
That third sign is the giveaway. If you’re doing everything right and still getting sticky resin, the hardener is almost certainly the problem. I spent an entire frustrating evening troubleshooting a “technique” problem that turned out to be a bottle of hardener that had been sitting in my garage through a hot summer.
How to Prevent It
- Store both resin and hardener in a cool, dark place at 15 °C to 25 °C. Not the garage. Not the shed.
- Keep bottles tightly sealed when not in use.
- Write the date you opened the bottle on the label. Simple, but incredibly useful.
- Don’t buy more hardener than you can use in 6 months. Buying bulk is only a deal if you actually use it before it expires.
Can You Fix It?
No. Expired hardener produces permanently soft resin. There’s no way to accelerate a reaction that the hardener can no longer drive. Replace the hardener, test with a small batch first to confirm the new stuff works, and re-pour.
Cause 6: Contamination
This is the weird one — the cause that makes you feel like the resin is haunted because everything else seems right.
What Goes Wrong
Certain substances interfere with the curing reaction even in tiny amounts. Silicone-based mold releases, certain oils, latex glove residue, and some cleaning products can inhibit the cross-linking reaction right at the surface. The contamination creates a thin layer of uncured resin at the mold-resin interface while the rest of the piece cures perfectly.
I discovered this one when I switched from nitrile to latex gloves (they were cheaper) and started getting sticky spots wherever my gloves had touched the inside of the mold. Took me three pours to connect the dots. Back to nitrile after that. Our epoxy resin safety guide goes into detail on why nitrile is the only glove type you should use.
How to Identify It
The pattern gives it away: the sticky area follows the exact shape of the mold surface, or it appears specifically where you touched the mold. The rest of the piece is hard and properly cured. That’s contamination.
How to Prevent It
- Use nitrile gloves, not latex. Latex can leave residue that inhibits curing.
- If using a silicone mold, make sure it’s platinum-cure silicone, not tin-cure (condensation-cure). Tin-cure silicone releases byproducts that can inhibit epoxy.
- Clean your mold with isopropyl alcohol before each pour.
- Do not use silicone spray as a mold release for epoxy resin. I’ve seen people recommend this online and it causes exactly this problem.
Can You Fix It?
Yes — since the contamination is only at the surface. Sand the sticky layer off with 120-grit sandpaper, clean with isopropyl alcohol, and pour a fresh coat. This fix works well because the underlying resin is fully cured.
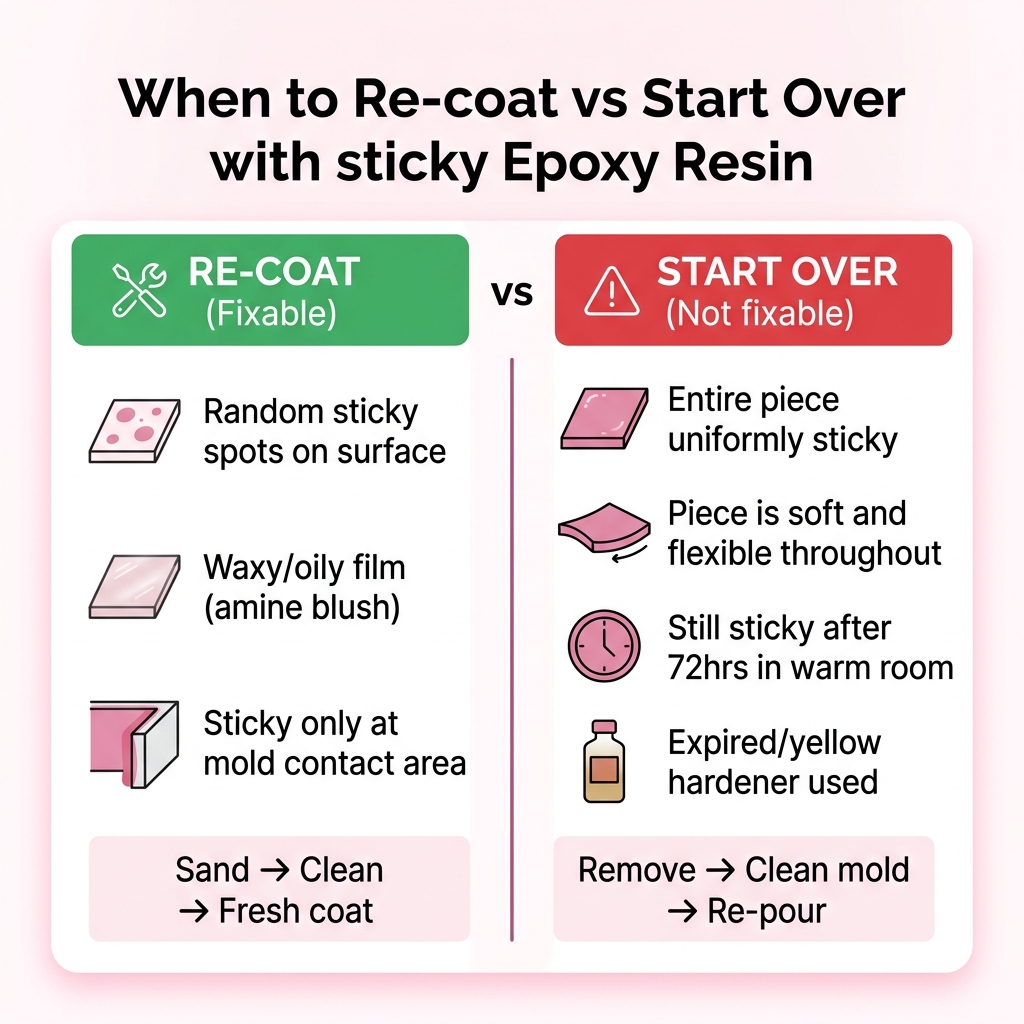
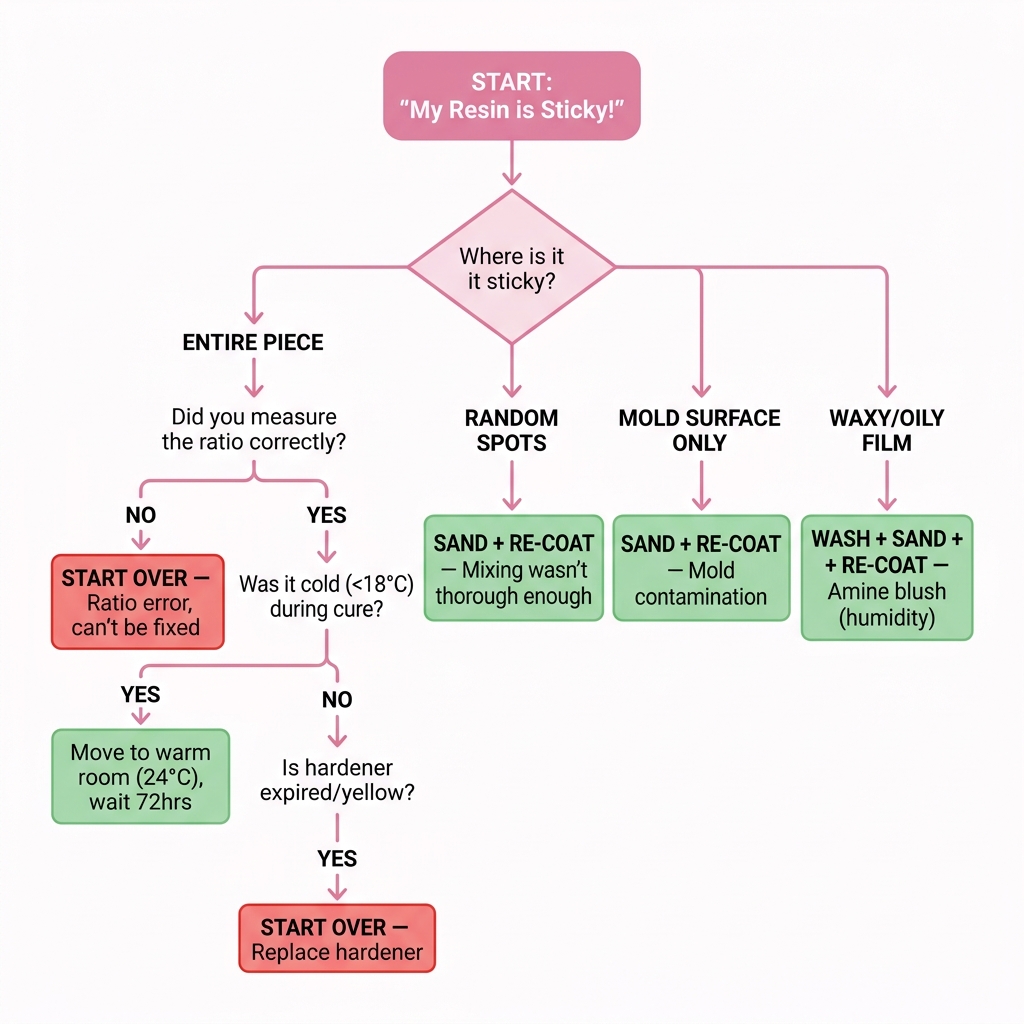
Decision Framework: Re-Coat vs. Start Over
This is the question that comes up every time — “can I save this, or do I have to throw it out?” Here’s how I decide:
| Situation | Fix |
|---|---|
| Entire piece is uniformly sticky | Start over. The ratio or hardener is the problem. |
| Random sticky spots on the surface | Sand, clean, re-coat. Likely a mixing issue. |
| Surface feels waxy or oily, underneath is hard | Wash with warm soapy water, sand, re-coat. This is amine blush. |
| Sticky only where the resin touched the mold | Sand surface, clean mold, re-coat. Likely contamination. |
| Piece is soft and flexible, not just surface-sticky | Start over. The cure failed throughout. |
| Sticky after 72+ hours in a warm room | Start over. Waiting longer will not help. |
How to Remove Sticky Resin and Salvage Your Mold
If you need to start over, here’s how to clean up without destroying your mold:
- Flexible silicone molds: Peel the sticky resin out carefully — silicone is forgiving and usually survives this fine. Wash the mold with warm soapy water and isopropyl alcohol. Let it dry completely before re-pouring.
- Rigid molds or surfaces: Scrape off as much resin as possible with a plastic scraper (metal can damage the mold surface). Use isopropyl alcohol or acetone to dissolve remaining residue. Go slow.
- Wood or porous surfaces: This is the tough one. Sticky resin on wood is very difficult to remove. Sand aggressively down to bare wood, then seal the wood with a thin coat of correctly mixed resin before doing the full pour. I’ve had to do this twice and it’s tedious, but it works.
Preventing Sticky Resin: The Checklist
I run through this before every pour now. It takes 60 seconds and it’s saved me from repeat failures:
- ☐ Room temperature is 22 °C to 26 °C
- ☐ Humidity is below 50%
- ☐ Hardener is within its shelf life and looks clear (not yellow)
- ☐ Ratio is measured accurately (use the resin calculator for exact Part A / Part B amounts)
- ☐ Mixed for at least 3 minutes with sides and bottom scraped
- ☐ Mold is clean and dry, gloves are nitrile (not latex)
- ☐ Piece is covered during curing to block dust and moisture
Follow this checklist and sticky resin goes from “constant headache” to “that thing that happened once.”
Calculate Your Amounts Right the First Time
Since incorrect ratio is the number-one cause of sticky resin, the simplest prevention is taking the guesswork out of measuring. Instead of estimating, enter your mold dimensions into the appropriate calculator:
- Circle resin calculator — round coasters, clock faces, dishes
- Rectangle resin calculator — trays, tiles, tabletops
- Square resin calculator — square coasters, trivets
- Hexagon resin calculator — hexagonal tiles, coasters
The calculator gives you the total volume plus the Part A and Part B split for your specific ratio. Measure those numbers exactly, mix thoroughly, and your chances of a perfect cure go up dramatically.