Epoxy Resin Safety 101: Ventilation, Gloves, and Handling Tips
Essential safety practices for working with epoxy resin at home. Learn about proper ventilation, nitrile gloves, eye protection, skin care, surface protection, and safe disposal of mixing tools.
I’ll be upfront — I didn’t take resin safety seriously when I started. I mixed my first few batches bare-handed in a closed room because the resin “didn’t smell that bad” and I figured gloves were for the cautious types. Then about three months in, I developed a rash on both hands that lasted two weeks. My doctor told me it was allergic contact dermatitis from repeated resin exposure, and that once you’re sensitized, it’s often permanent. I’ve worn nitrile gloves for every single pour since.
That experience is why I wrote this guide. Resin safety isn’t about being paranoid — it’s about building habits that take five minutes to set up and let you keep crafting for years without health issues.
Important: This guide covers general best practices, not medical advice. Always read the safety data sheet (SDS) provided by your specific resin manufacturer for product-specific guidance. For poison emergencies in the US, call Poison Control at 1-800-222-1222 (available 24/7). If you’re outside the US, look up your country’s poison control hotline and keep the number posted in your workspace.
Why Safety Matters With Epoxy Resin
I’m not trying to scare anyone away from resin — it’s an incredible material and I use it every week. But it is a chemical product, and respecting that fact is what separates people who enjoy resin crafting for decades from people who have to quit because of health problems.
The two main concerns are:
-
Skin sensitization. This is the one that got me. Repeated unprotected skin contact with uncured resin or hardener can trigger allergic contact dermatitis. The CDC’s NIOSH resource on occupational dermatitis explains how this works: it’s cumulative. You might handle resin bare-handed ten, twenty, fifty times with zero reaction. Then one day your immune system decides it’s had enough, and suddenly even a tiny drop on your wrist causes itching, redness, or blisters. Once you’re sensitized, it’s typically permanent. There’s no “building up a tolerance.” It only goes one direction.
-
Respiratory irritation. Most room-temperature-cure epoxy resins produce relatively low fumes compared to polyester or polyurethane resins — you won’t get the eye-watering chemical smell of fiberglass work. But the hardener component does produce some vapor, and in a poorly ventilated room, that can build up to levels that cause headaches, dizziness, and throat irritation. I learned this on a cold winter day when I kept all my windows shut. Forty minutes into a pour, I had a headache that lasted the rest of the evening.
Both of these risks are easily managed with simple, inexpensive precautions. That’s the good news — none of this requires expensive equipment or complicated procedures.
Ventilation: Your First Line of Defense
If I could only give one piece of safety advice, it would be this: get air moving through your workspace. Good ventilation does more for your health than any other single precaution, and it doesn’t require anything fancy.
Natural Ventilation
For occasional home projects, two open windows is all you need:
- Open at least two windows in the room to create cross-ventilation — air flows in through one and out through the other.
- Position your workspace between the two windows so the airflow moves across your work surface and carries fumes away from you.
- If the room has only one window, place a box fan in the window pointing outward to pull air (and fumes) out of the room. Crack a door on the opposite side to let fresh air replace what the fan is pulling out.

I keep my workspace set up in a spare bedroom with windows on two walls. In warmer months I just open both windows and I’m set. In winter, I compromise — I crack both windows about four inches and run a space heater to keep the room temperature in the working range. It’s not as good as fully open windows, but it’s vastly better than a sealed room.
Mechanical Ventilation
For regular resin work or larger projects:
- A portable exhaust fan placed at the edge of your workspace pulling air away from your face is very effective. You can find decent ones for $20-30.
- Point the fan so fumes travel away from you, not across your breathing zone. This sounds obvious, but I’ve seen people set up fans that blow fumes directly into their face.
- If you work in a garage, keep the garage door open at least partially during mixing and pouring, and for the first 2 to 4 hours of curing when vapor emissions are highest.
When You Need a Respirator
If adequate ventilation just isn’t possible in your workspace — small enclosed room, no windows, dead of winter — wear a half-face respirator fitted with organic vapor cartridges (OV cartridges). OSHA’s respiratory protection guidelines cover the basics of selecting the right cartridge type. I also recommend one when:
- Sanding cured resin — switch to P100 particulate filters for this. Resin dust is no joke.
- Using a heat gun on resin — the heat accelerates vapor release significantly
- Working for extended sessions of more than 2 hours continuously
- Using higher-volatility products — check the SDS; some hardeners are worse than others
A basic half-face respirator with interchangeable cartridges costs about $25-40 and lasts for many sessions before the cartridges need replacing. I bought mine three years ago and I’ve only gone through maybe six sets of cartridges. It’s one of the cheapest pieces of safety equipment you’ll ever buy relative to what it protects.
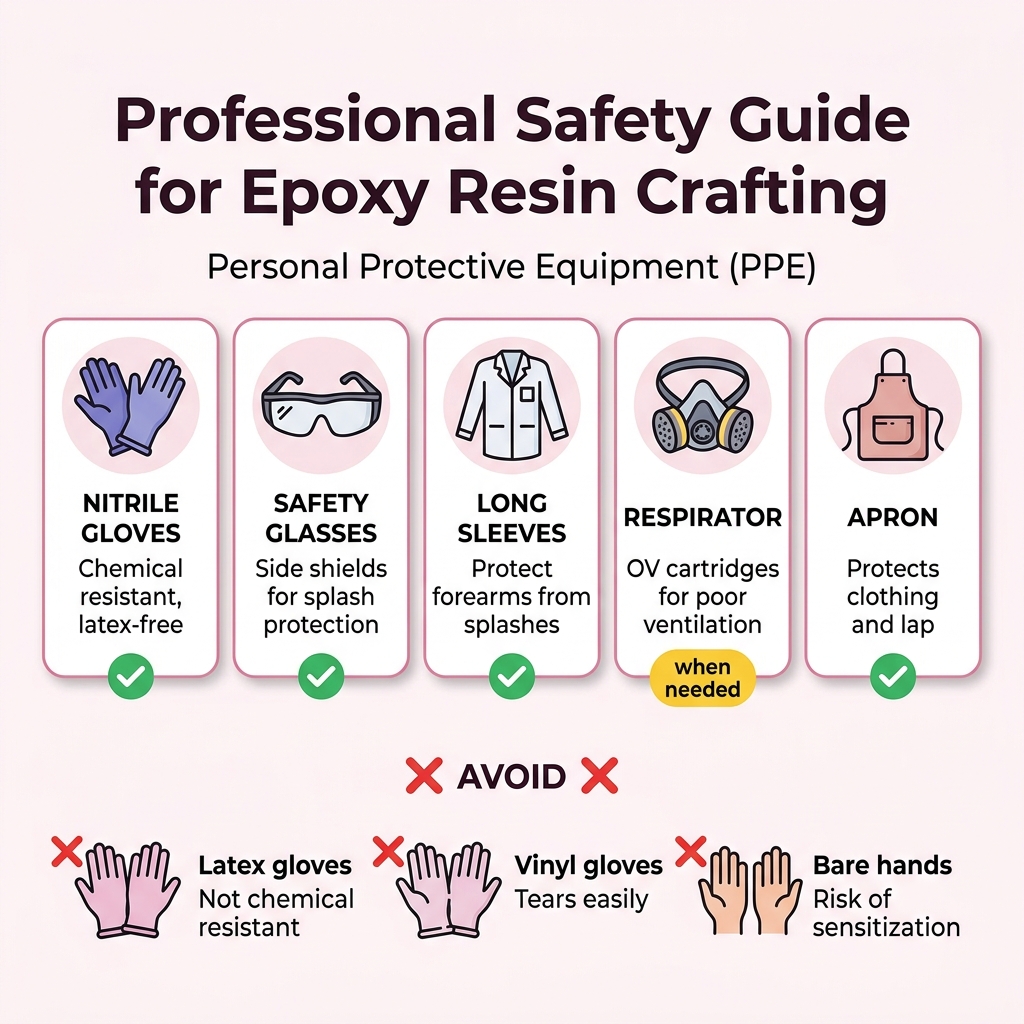
Gloves: Nitrile, Not Latex
Gloves are the one thing I am absolutely rigid about. No exceptions, no “just this quick pour,” no “I’ll wash my hands right after.” Your hands are the body parts most likely to contact uncured resin, and bare skin exposure is how sensitization starts.
Why Nitrile
Nitrile gloves are the standard for epoxy resin work for three good reasons:
- They actually resist penetration by epoxy resin and hardener components. This matters more than you think.
- They’re latex-free, which avoids adding a second allergen risk on top of the resin itself.
- They give you decent dexterity for measuring, pouring, and spreading — you can still feel what you’re doing.
I buy boxes of 100 disposable nitrile gloves. They’re about $10-15 a box and each pair is good for one session.
What to Avoid
- Latex gloves — and this surprised me when I first learned it — are not chemically resistant to epoxy components. Resin can penetrate latex in minutes, which means you’re getting a false sense of protection while your skin is actually being exposed. Plus latex carries its own allergy risk.
- Vinyl gloves offer minimal chemical resistance and tear easily. They’re better than bare hands, but not by much.
- Bare hands — never. Even if you’ve been doing it for years without a problem, sensitization can develop suddenly. That’s exactly what happened to me.
Best Practices
- Put gloves on before you open any resin or hardener containers. Not after you’ve already cracked the lids.
- Change gloves if they get torn, heavily contaminated, or if you’ve been working for more than 30 minutes. Over time, resin can seep through even nitrile.
- Remove gloves carefully — this is something most people don’t think about. If you pull them off by the fingertips, you’re pressing contaminated resin against your bare skin.
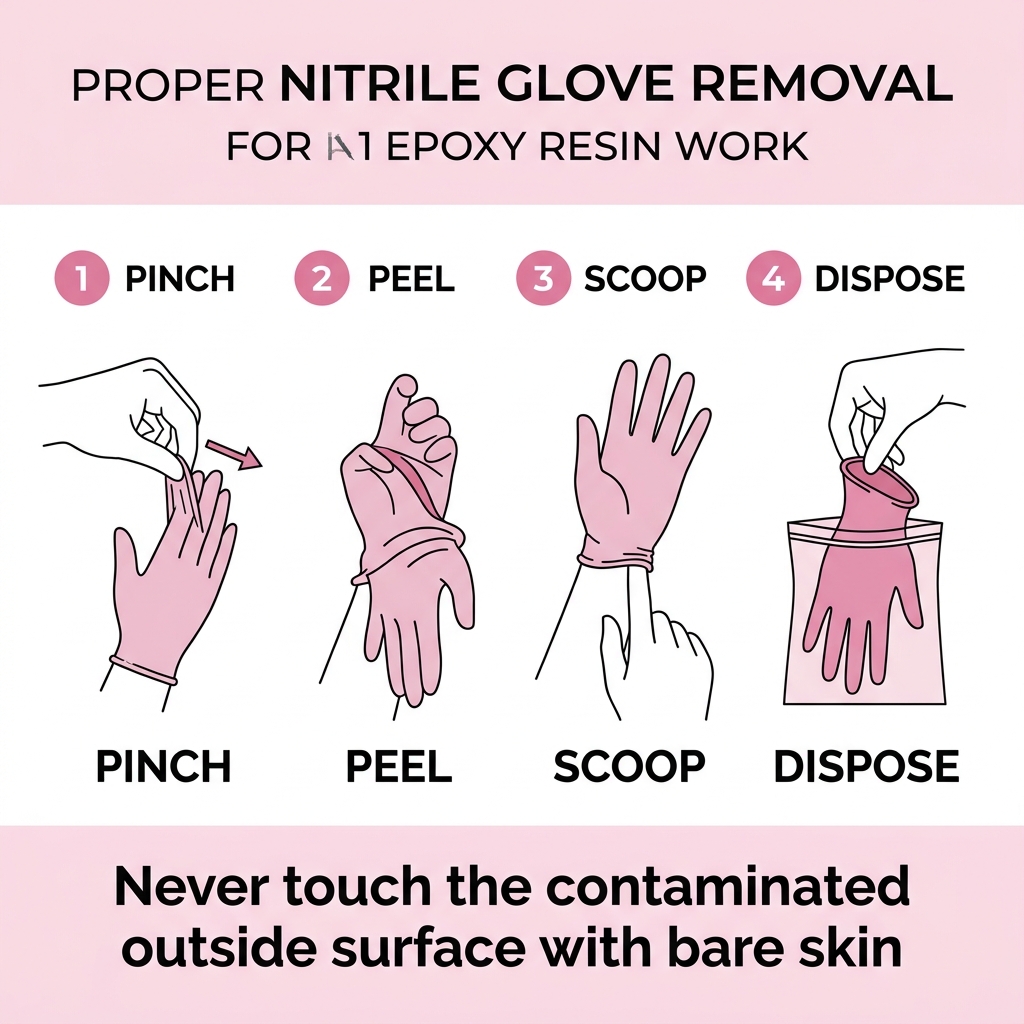
The right technique: pinch the wrist of one glove with the other gloved hand, peel it off turning it inside out as you go, then slide a bare finger under the wrist of the remaining glove from the inside and peel that one off too. Drop both in a sealed bag. It takes ten seconds once you’ve practiced it.
Eye Protection
Resin splashes happen. They just do. Especially during mixing — the stirring action can fling tiny droplets that you don’t even feel until they land. A single splash of uncured hardener in the eye can cause serious irritation and needs immediate attention.
What to Wear
- Safety glasses or goggles with side shields. Basic wraparound safety glasses from any hardware store are perfectly fine — we’re not talking about lab-grade chemical goggles for most home projects.
- If you wear prescription glasses, invest in over-glasses safety goggles that fit over your existing frames. They’re about $8-12 and worth every penny.
When to Wear Them
- During mixing — stirring can fling tiny droplets
- During pouring — resin can splash on impact with the mold
- When using a heat gun or torch to pop bubbles — the air blast scatters resin droplets more than you’d expect
- When sanding cured resin — dust particles
I’ll admit I didn’t wear eye protection for my first year of resin work. Nothing happened. But that’s like saying “I never wore a seatbelt and I never got in an accident” — it only takes one splash to make you wish you’d been wearing them all along.
If Resin Contacts Your Eyes
This is important, so read it even if you skip everything else:
- Flush immediately with clean water for at least 15 minutes. Hold the eyelids open during flushing — your instinct will be to clamp them shut, but you need the water to actually reach the eye surface.
- Call for help. In the US, contact Poison Control at 1-800-222-1222 or call 911 if the irritation is severe. Outside the US, call your local emergency number or poison control center.
- See a medical professional after flushing, even if the irritation seems mild. Some damage isn’t immediately obvious.
- Bring the product’s SDS or label to the appointment. The doctor needs to know the specific chemicals involved.
Skin Protection Beyond Gloves
Gloves protect your hands, but resin has a way of finding other exposed skin — forearms, the side of your wrist, your face if you absentmindedly scratch your nose with a gloved hand (I’ve done it).
Protective Clothing
- Wear long sleeves or throw on a cheap lab coat/smock over your clothes. I use an old button-up shirt that’s become my dedicated “resin shirt.” Disposable sleeve protectors work great too if you want something purpose-built.
- An apron protects your torso and lap from drips. Especially important if you’re working standing up and pouring at waist height.
- Tie back long hair. Resin in hair is extremely difficult to remove and often requires cutting it out. I’ve seen this happen to someone in a workshop and it’s not fun.
If Resin Contacts Your Skin
This is counterintuitive, so pay attention:
- Do NOT use solvents like acetone, isopropyl alcohol, or paint thinner to remove resin from skin. I know it seems logical — “solvent dissolves resin, problem solved.” But these solvents strip your skin’s natural oils and actually help the resin chemicals penetrate deeper into your skin. You’re making the exposure worse.
- Instead, wash immediately with soap and warm water. Regular hand soap or dish soap works perfectly.
- For stubborn, partially-cured resin that soap won’t budge, use a citrus-based waterless hand cleaner (mechanics use these). Rub it into the spot, work it gently, then wash off with soap and water.
- If a rash, redness, or itching develops after skin contact, stop working with resin and see a healthcare professional. Don’t wait for it to “go away on its own” — getting it documented early matters.
Workspace Surface Protection
This is partly a safety measure — you don’t want uncured resin contaminating surfaces you touch later without gloves — and partly just practical. Resin drips are inevitable, and cleaning cured resin off a table is a nightmare.
Work Surface Setup
- Cover your entire work area with a disposable protective layer. My favorites:
- Silicone mats — resin peels right off when cured, and they’re reusable for years. Best long-term investment.
- Plastic sheeting or trash bags taped to the table — cheap and disposable
- Wax paper or parchment paper — single-use, very inexpensive, easy to roll up and toss
- Extend the covering at least 6 inches beyond the edges of your project. Resin drips and overflows are common, especially with flood-coat techniques where you’re pouring to the edges.
- Keep your mixing cups and stir sticks on the protected area, not on a separate unprotected surface.
Floor Protection
If you’re working on a table, drips will eventually find the floor. Trust me. I’ve got permanent resin spots on my workshop floor from when I thought “it probably won’t drip that far.” Lay down a drop cloth or plastic sheeting beneath your work table.
Mixing and Measuring Safety
The measuring and mixing phase is where most accidental exposure happens. OSHA’s chemical handling best practices emphasize that the highest risk of skin and eye contact occurs during transfer and mixing operations — which tracks perfectly with my experience. You’re opening containers, pouring liquids, stirring — it’s the most hands-on part of the process.
Measuring
- Use dedicated measuring cups with clear volume markings. Do not use kitchen cups and then put them back in the kitchen drawer. Resin residue + food preparation = bad combination.
- Pour slowly to avoid splashes. Hold the container at arm’s length from your face when pouring.
- Use our resin calculator to figure out the exact amounts before you open any containers. Knowing your numbers in advance means you’re not frantically doing math while your open time is ticking down.
Mixing
- Stir slowly and deliberately. Fast, aggressive stirring creates bubbles and flings droplets. I mix with a gentle folding motion, scraping the sides and bottom of the cup.
- Mix in a container that’s at least 3 to 4 times the volume of your resin batch. A half-full cup is dramatically less likely to splash than one filled to the brim.
- Don’t mix near food, drinks, or open food containers. Seems obvious, but I’ve walked into workshops where someone had a coffee mug sitting right next to their mixing station.
Disposal of Resin Waste
Uncured resin is a chemical product. You can’t just pour it down the sink and wash your hands of it — literally and figuratively.
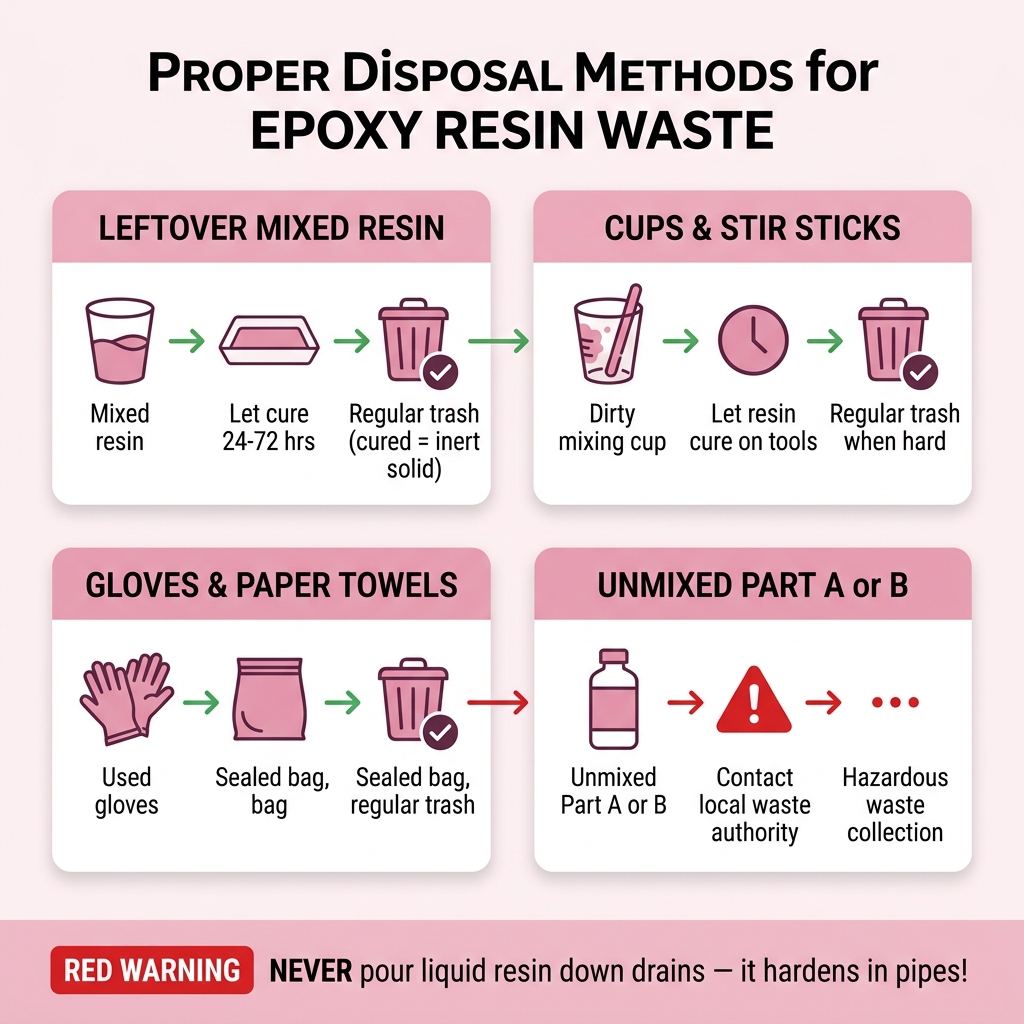
How to Dispose of Leftover Resin
-
Small amounts of mixed resin: Pour leftover mixed resin into a shallow container (a disposable foil tray works well) in a thin layer. Let it fully cure — 24 to 72 hours depending on the product. Once cured, it’s an inert solid and can go in regular household trash in most areas.
-
Mixing cups and stir sticks: Let the resin remaining on these tools cure fully. Once it’s hardened, toss them in regular trash. Do not wash uncured resin down the drain.
-
Contaminated gloves and paper towels: Bag them in a sealed plastic bag and dispose of in regular trash. The small amounts of resin will cure inside the bag.
-
Unused Part A or Part B separately: This is the tricky one. If you need to dispose of unmixed resin or hardener — say, an expired bottle of hardener that’s turned yellow — don’t pour it down the drain or into the trash as a liquid. Check with your local waste management for chemical disposal options. Most areas have periodic hazardous household waste collection events.
What NOT to Do
- Never pour liquid resin down any drain. It will harden in the pipes and create a blockage that’s extremely expensive to fix. A plumber once told me the resin blockage jobs are some of the worst he deals with because the cured resin is basically part of the pipe at that point.
- Never mix large quantities in a tall, narrow container and walk away. The concentrated exothermic reaction can generate enough heat to melt the container, produce smoke, or in extreme cases ignite nearby materials. I always pour into a wide, shallow tray if I have leftover mixed resin.
- Never burn uncured resin. It releases toxic fumes.
Children and Pets
This is straightforward but critical. Epoxy resin should be used completely out of reach of children and pets.
- Work in a room that can be closed off during curing. My workspace has a door with a latch, and I keep it shut for the first 24 hours of every cure.
- Store resin and hardener containers in a locked cabinet or high shelf. Hardener bottles in particular can look like regular household products.
- If a child or pet contacts uncured resin, wash the affected area immediately with soap and water. Call Poison Control at 1-800-222-1222 (US) or your local equivalent, or contact your veterinarian for pets. Don’t wait to see if symptoms develop — call right away.
Quick Safety Checklist for Every Session
I keep a laminated version of this taped to the wall above my workspace. Sounds excessive, but it takes 30 seconds to glance at and it’s saved me from forgetting things more times than I can count.
Before you start your next project, confirm:
- ☐ Workspace is ventilated (windows open or fan running)
- ☐ Nitrile gloves are on before opening any containers
- ☐ Safety glasses are on
- ☐ Long sleeves or arm protection
- ☐ Work surface is covered with protective material
- ☐ Mixing cups, stir sticks, and tools are ready
- ☐ Amounts are pre-calculated using the resin calculator
- ☐ Timer is ready to track open time
- ☐ Soap and water are within reach for skin cleanup
- ☐ Room is closed off from children and pets
Final Thought
Look — I get it. When you’re excited about a project and just want to start pouring, the last thing you want to do is fuss with gloves and windows and checklists. I was that person. And then I spent two weeks with itchy, blistered hands and a doctor telling me the sensitivity might never go away.
Every precaution on this list is cheap, fast, and easy. Nitrile gloves are ten cents a pair. Opening a window is free. A pair of safety glasses costs less than a cup of coffee. Five minutes of setup before each session is a very small price for being able to keep doing something you love.