Resin Mixing Ratios Explained: 1:1 vs 2:1 vs 3:1 vs 4:1 — Which Should You Use?
Understand epoxy resin mixing ratios in depth. Learn which products use 1:1, 2:1, 3:1, or 4:1 ratios, why deep-pour resins use higher ratios, what happens if you get it wrong, and how to read your product label.
Let me tell you about the most expensive lesson I ever learned in resin crafting. I was working on my first river table — a beautiful piece of walnut with a deep blue channel. Mixed up about 1.5 liters of resin, eyeballed the ratio because “close enough, right?” and poured it in. Two days later the surface was still tacky. Three days. A week. It never cured. That whole pour — the resin, the pigment, the hours of prep work sealing the wood — went straight in the bin.
The mixing ratio on your resin bottle isn’t a suggestion. It’s the exact chemical recipe for a complete reaction. Every molecule of resin needs to pair with a specific number of hardener molecules. Get the numbers right, and you get a crystal-clear, rock-hard cure. Get them wrong, and you get a sticky, soft mess that no amount of waiting will fix.
This guide breaks down what ratios actually mean at a chemical level, covers the four most common ones, and helps you figure out which one your project needs.
What Is a Mixing Ratio?
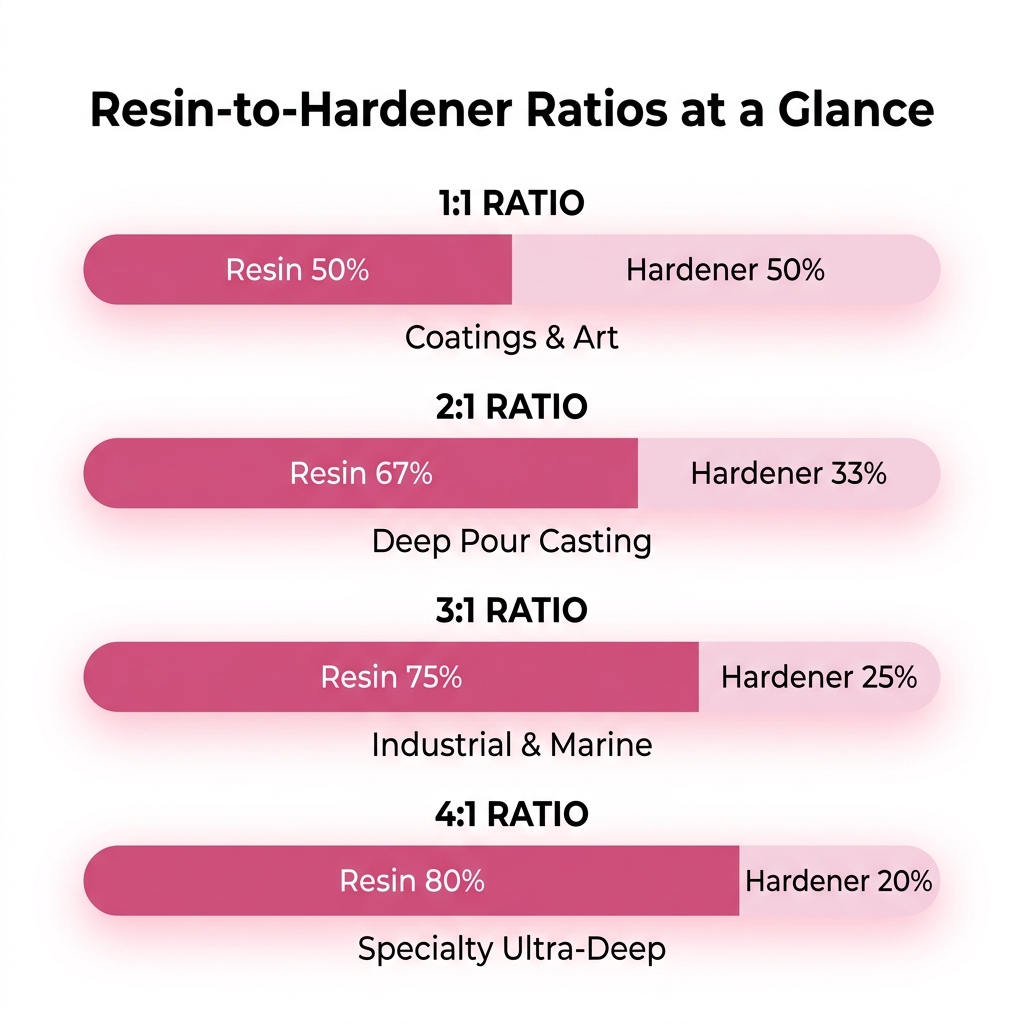
A mixing ratio tells you the proportion of resin (Part A) to hardener (Part B) you need to combine for a complete chemical reaction. The ratio ensures that every reactive molecule in the resin finds a matching partner in the hardener. In chemistry, this is called stoichiometry — matching reactants in the exact proportions needed for a complete reaction. When they all pair up, you get a fully cross-linked polymer — hard, clear, and durable.
When they don’t all pair up — because you used too much or too little of one component — the leftover unreacted molecules stay in their liquid state. That’s where the stickiness, softness, and cloudiness come from. I think of it like pairing dance partners: if three people show up without a match, they just stand around on the dance floor doing nothing. Same thing happens inside your resin.
By Volume vs. By Weight
This distinction tripped me up badly when I first started, and I’ve seen it confuse people in every resin group I’m part of.
By volume means you measure using graduated cups or syringes. If a 1:1 ratio requires 200 ml total, you pour 100 ml of resin and 100 ml of hardener. Simple.
By weight means you put a cup on a scale and weigh each component. Here’s the tricky part — resin and hardener have different densities, so equal volumes don’t weigh the same. A product might say 100:83 by weight but 1:1 by volume. Those are the same ratio expressed two different ways, and mixing them up will wreck your pour.
Most craft resins specify the ratio by volume because it’s easier for hobbyists. Professional and industrial products lean toward weight measurements for better precision. I’ve switched to measuring by weight even for my craft resins — a $15 kitchen scale is the best investment I’ve made. But either method works as long as you know which one the label is referring to.
Always check the label. If it says “by volume,” use measuring cups. If it says “by weight,” use a digital scale. If it doesn’t specify either way, look up the product’s technical data sheet (TDS) online. Every manufacturer publishes one — Entropy Resins, for example, has downloadable TDS documents for every product that spell out the ratio, pot life, and cure schedule.
1:1 Ratio — Equal Parts
What It Means
One part resin to one part hardener, by volume. If you need 300 ml total, you mix 150 ml resin and 150 ml hardener. Doesn’t get simpler than that.
Which Products Use 1:1
The 1:1 ratio is by far the most common one you’ll encounter in the craft resin world:
- Tabletop coating resins — those thin flood coats on wood, artwork, and countertops
- Resin art products — for fluid art, petri dishes, geode art, ocean waves
- General-purpose craft resins — the all-rounders for coasters, trays, and jewelry
- Tumbler resins — thin coatings spun onto stainless steel tumblers
Typical Properties
| Property | Typical Range |
|---|---|
| Maximum pour depth | 3 to 6 mm per layer |
| Open time | 25 to 45 minutes |
| Demold time | 12 to 24 hours |
| Full cure | 72 hours |
| Viscosity | Medium (self-leveling) |
Why 1:1 Is Popular
Two reasons. First, it’s forgiving. When you’re mixing equal volumes, a small measurement error gets diluted across both components equally. If you accidentally pour 105 ml of resin instead of 100 ml, that 5% error is spread across the full batch and usually won’t cause noticeable issues.
Second, it’s intuitive. Even without a calculator, most people can eyeball “equal amounts” with decent accuracy. Though I should say — “decent accuracy” still isn’t as good as actually measuring. I eyeballed my first 20 or so pours and got away with it, but when I finally started measuring precisely, the difference in clarity and hardness was obvious.
Best For
- Thin coatings (countertops, artwork, tumblers)
- Resin art (ocean waves, geode art, petri dishes)
- Small castings up to 6 mm deep (coasters, bookmarks, keychains)
Use our resin calculator to get the exact Part A and Part B split for any mold dimensions.
2:1 Ratio — Deep Pour Casting
What It Means
Two parts resin to one part hardener, by volume. If you need 600 ml total, that’s 400 ml resin and 200 ml hardener.
Which Products Use 2:1
The 2:1 ratio is the standard for deep-pour casting resins:
- River table resins — designed for pours of 2 to 5 cm per layer
- Deep casting resins — for embedding objects, making thick blanks, and filling large molds
- Some laminating resins — used in fiberglass and composite work
Why Deep-Pour Resins Use Higher Resin Ratios
This is a question I get asked constantly, and once you understand the chemistry it makes perfect sense.
Curing is an exothermic reaction — it releases heat. The more hardener in the mix, the more reactive sites there are per unit of volume, and the faster and hotter the reaction goes. In a thin 3 mm coating, that heat escapes quickly through the large surface area. No problem.
But in a 4 cm deep pour? The heat has nowhere to go. It builds up in the center, which makes the reaction even faster, which generates even more heat. I’ve felt this firsthand — put your hand near a thick pour about 30 minutes in and you can feel the warmth radiating off it. If it gets out of control, the resin can crack, turn yellow, warp the mold, or in extreme cases actually start smoking. I once had a 2-inch pour of coating resin (wrong product for the job — I was a beginner) get so hot it warped the silicone mold into a banana shape.
Deep-pour resins solve this elegantly by using less hardener relative to the resin. Fewer reactive sites per unit of volume means a slower, cooler reaction that can handle thick layers without overheating.
Typical Properties
| Property | Typical Range |
|---|---|
| Maximum pour depth | 2 to 5 cm per layer |
| Open time | 40 to 80 minutes |
| Demold time | 24 to 48 hours |
| Full cure | 5 to 7 days |
| Viscosity | Low (very fluid, good for filling around objects) |
Best For
- River tables and live-edge pours
- Large castings (blanks, paperweights, embedments)
- Projects deeper than 6 mm
Use the rectangle resin calculator for river table channels or the cylinder resin calculator for cylindrical molds to get exact volumes with the 2:1 split.
3:1 Ratio — Industrial and Specialty
What It Means
Three parts resin to one part hardener, by volume. For 400 ml total: 300 ml resin and 100 ml hardener.
Which Products Use 3:1
The 3:1 ratio is less common in craft applications. You’ll mostly see it in:
- Industrial epoxy systems — floor coatings, structural adhesives
- Some marine resins — boat building and repair
- Certain deep-pour formulations — extra-deep pours of 5+ cm in a single shot
Why 3:1 Exists
Some applications need an even slower cure than 2:1 provides. Picture an industrial floor coating job — the installer might need 60 to 90 minutes of working time to spread resin over a large area before it starts gelling. You can’t do that with a 1:1 coating resin that starts thickening in 25 minutes. Reducing the hardener proportion extends the open time and slows everything down.
I’ve only used a 3:1 product once, for a very deep embedment project. The extra-long working time was nice, but waiting 10 days for full cure was… less nice. Patience is not my strong suit.
Typical Properties
| Property | Typical Range |
|---|---|
| Maximum pour depth | 4 to 8 cm per layer |
| Open time | 50 to 90 minutes |
| Demold time | 36 to 72 hours |
| Full cure | 7 to 10 days |
| Viscosity | Very low |
Important Note
Here’s where 3:1 gets tricky. Because the hardener volume is small relative to the total, measurement precision becomes critical. A 10 ml measuring error at a 1:1 ratio affects about 5% of the hardener volume. That same 10 ml error at a 3:1 ratio affects 10% of the hardener volume — double the proportional impact. That’s enough to noticeably affect cure quality.
4:1 Ratio — Specialty Formulations
What It Means
Four parts resin to one part hardener, by volume. For 500 ml total: 400 ml resin and 100 ml hardener.
Which Products Use 4:1
The 4:1 ratio is pretty rare and you’ll mostly encounter it in:
- Some ultra-deep-pour resins — designed for single pours of 8+ cm
- Certain marine and aerospace adhesives
- Specialty art resins formulated for specific effects
Why 4:1 Is Uncommon
The tiny hardener proportion makes measurement errors extremely impactful. A 5% volume error in the hardener at a 4:1 ratio can genuinely be the difference between a perfect cure and a permanently soft piece. That precision requirement makes 4:1 products challenging for casual crafters and honestly, I’d recommend them only if your project specifically demands it and you’re comfortable measuring with a scale.
Typical Properties
| Property | Typical Range |
|---|---|
| Maximum pour depth | 6 to 12 cm per layer |
| Open time | 60 to 120 minutes |
| Demold time | 48 to 96 hours |
| Full cure | 7 to 14 days |
| Viscosity | Very low |
What Happens If You Get the Ratio Wrong?
I’ve been on both sides of this mistake, so let me save you the trouble.
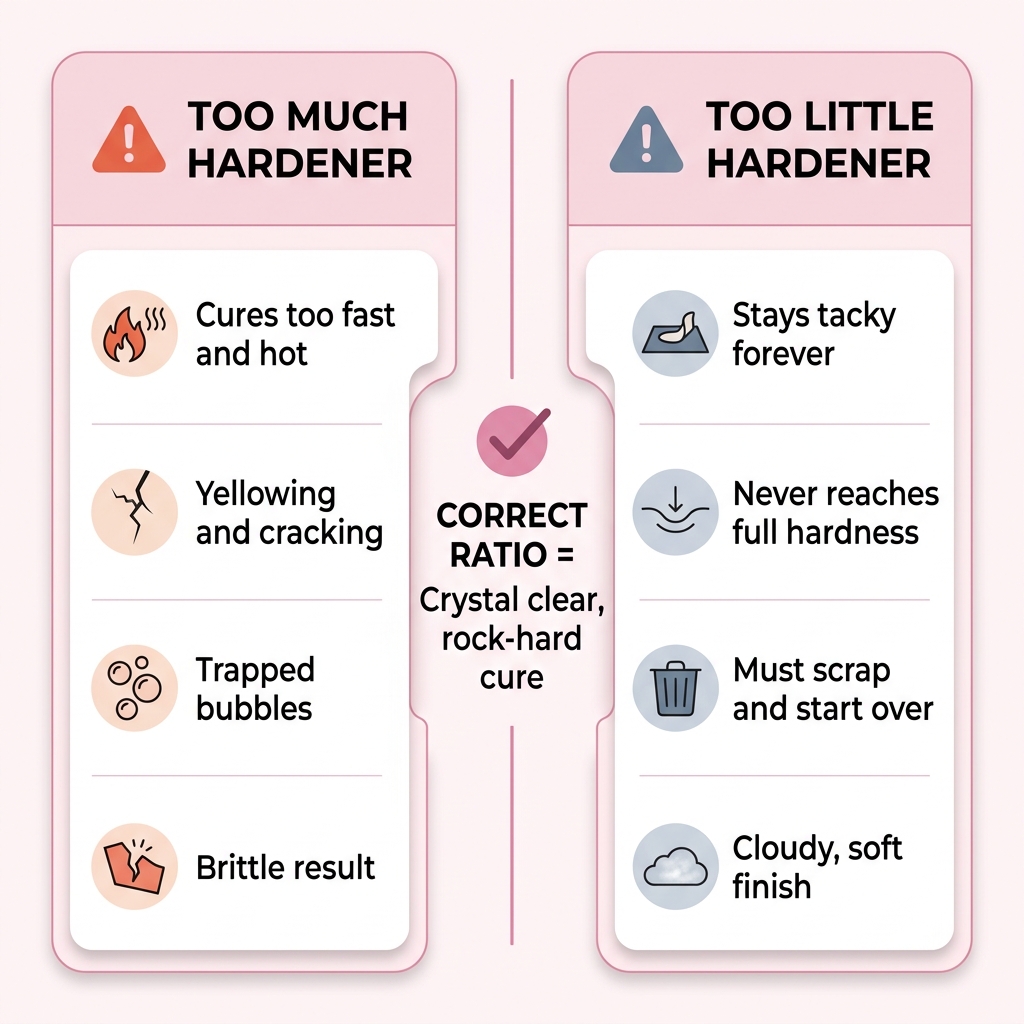
Too Much Hardener (Over-Catalyzed)
I did this on my third or fourth pour — added a splash of extra hardener thinking it would make the resin cure faster and harder. It did cure faster. Way too fast.
- The reaction proceeds hotter and faster than intended
- In thin layers: you lose working time and trap bubbles that can’t rise out before the resin gels
- In thick layers: the excess heat can cause yellowing, cracking, warping, or nasty surface defects
- The cured piece ends up more brittle — I had one crack in half just from dropping it on carpet
Too Little Hardener (Under-Catalyzed)
This is the mistake from my river table story at the top. It’s worse than adding too much, because there’s absolutely no fix.
- The reaction proceeds too slowly or never completes at all
- The surface or entire piece stays tacky or soft — permanently
- The resin never reaches full hardness, so it dents under any pressure
- You cannot save it. Under-catalyzed resin will not harden with more time, more heat, or more hope. You have to scrape it out and start over
How Much Error Is Tolerable?
This is something I wish more resin brands were upfront about:
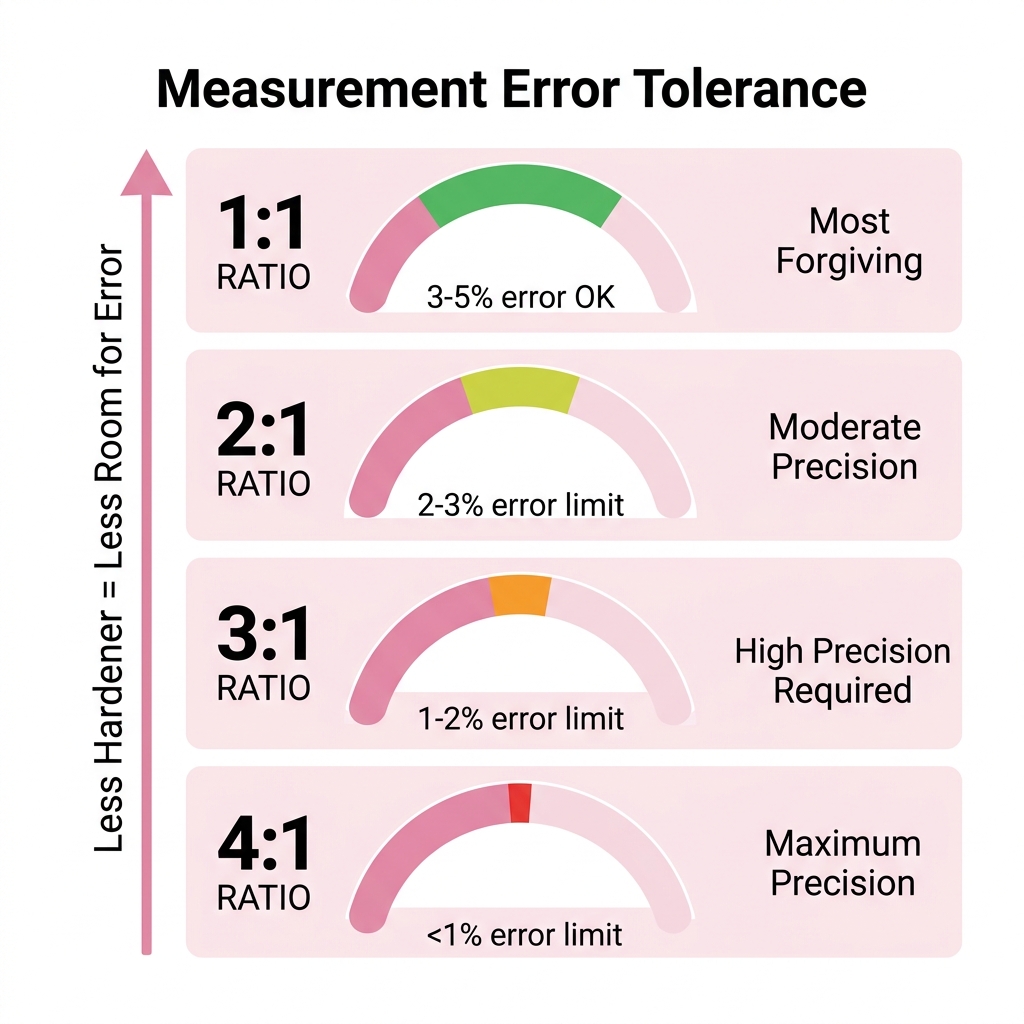
- 1:1 resins: Generally tolerate measurement errors up to 3% to 5% without visible issues
- 2:1 resins: Errors beyond 2% to 3% can produce noticeable softness or surface problems
- 3:1 and 4:1 resins: Need precision within 1% to 2% for reliable curing
This is exactly why using a calculator matters. Our resin calculator takes your total mold volume and splits it into precise Part A and Part B amounts for any ratio — 1:1, 2:1, 3:1, or 4:1. No mental math, no “close enough.”
How to Read a Product Label to Find the Correct Ratio
You’d think every resin bottle would have the ratio printed in big numbers on the front. Some do. Many don’t. Here’s where to find it when it’s not obvious.
On the Bottle or Box
Look for phrases like:
- “Mix ratio: 1:1 by volume”
- “Mixing: 2 parts A to 1 part B”
- “100:50 by weight”
The first number is always the resin (Part A). The second number is always the hardener (Part B).
On the Technical Data Sheet (TDS)
If the ratio isn’t clearly stated on the packaging — and I’ve bought brands where it’s buried in tiny text on the back — search for the product name plus “TDS” or “technical data sheet” online. The TDS always includes the mix ratio, pot life, cure schedule, and other specs you actually need.
Common Label Traps
I’ve fallen for all three of these at some point:
- “100:50 by weight” is the same as 2:1 by weight, but it’s not necessarily 2:1 by volume. Resin and hardener have different densities, so weight ratios and volume ratios aren’t interchangeable. If your label says one thing and you measure the other way, you’ll get an incorrect mix. When in doubt, contact the manufacturer.
- “Mix equal parts” almost always means 1:1 by volume, even if the label doesn’t explicitly say “by volume.” I’ve never encountered a product that says “equal parts” and means by weight, but always double-check.
- Products sold as kits where one bottle is bigger than the other. This confused me at first — why are the bottles different sizes? Because you’re supposed to use all of each bottle together. The size difference already reflects the correct ratio. No measuring needed if you’re using the whole kit.
Ratio Comparison Summary
| Ratio | Hardener % of Total | Measurement Sensitivity | Typical Use | Cure Speed |
|---|---|---|---|---|
| 1:1 | 50% | Low (forgiving) | Coatings, art, small castings | Fast (72 hrs full) |
| 2:1 | 33% | Medium | Deep-pour casting, river tables | Medium (5-7 days) |
| 3:1 | 25% | High | Industrial, marine, extra-deep | Slow (7-10 days) |
| 4:1 | 20% | Very high | Specialty deep-pour, aerospace | Very slow (7-14 days) |
Choosing the Right Ratio for Your Project
Honestly, for most crafters this decision is pretty straightforward:
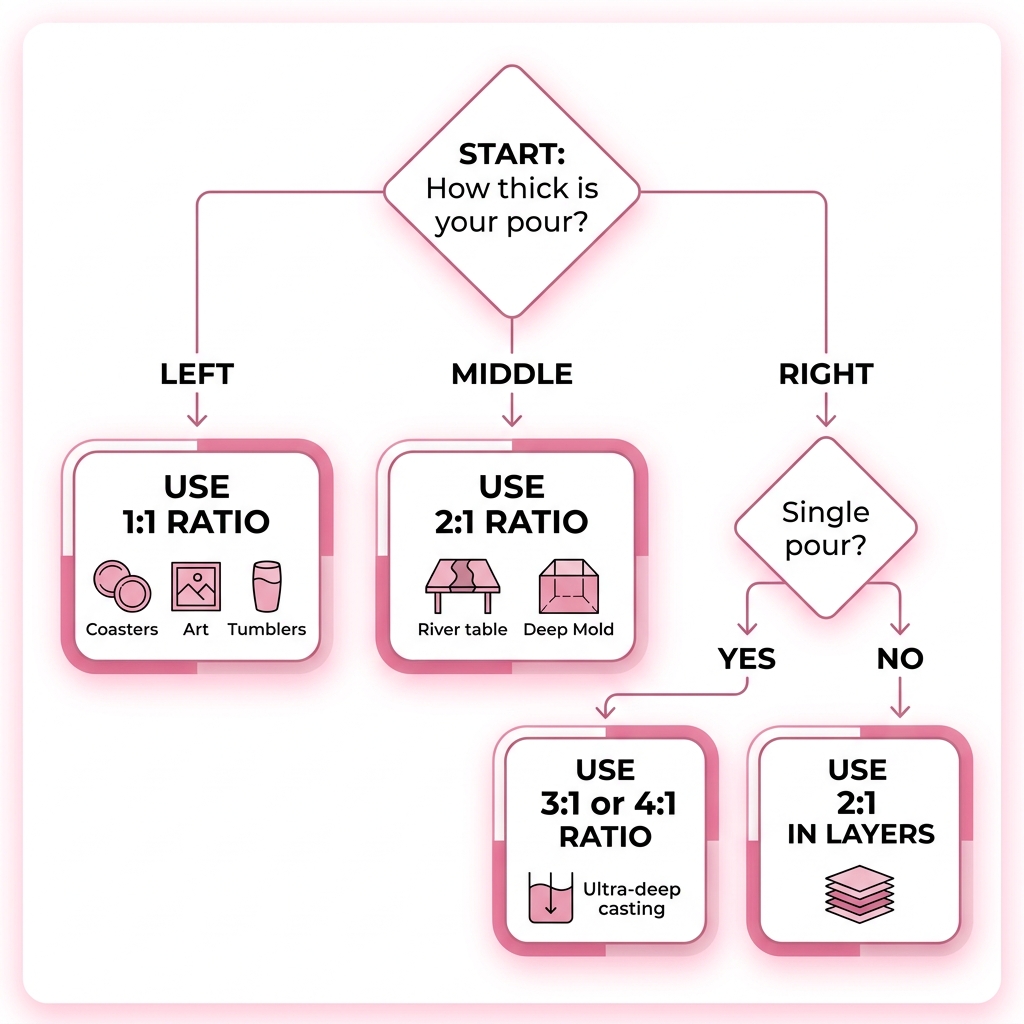
- Pouring a layer thinner than 6 mm? Use a 1:1 coating resin. This covers coasters, artwork, tumblers, countertops — basically most craft projects.
- Pouring a layer between 6 mm and 5 cm? Use a 2:1 deep-pour casting resin. River tables, thick castings, and embedment projects live here.
- Pouring a single layer thicker than 5 cm? Look for a 3:1 or 4:1 ultra-deep-pour product, or pour a 2:1 resin in multiple layers.
If you’re anything like me when I started, you’re probably making coasters or small art pieces — in which case a 1:1 resin is your go-to and you don’t need to overthink it. I didn’t touch a 2:1 product until I was six months into the hobby and ready for my first river table.
Calculate Your Exact Amounts
Regardless of which ratio you use, the math for splitting the total volume into Part A and Part B works the same way:
- Part A (Resin) = Total Volume × (Resin Parts ÷ Sum of Both Parts)
- Part B (Hardener) = Total Volume × (Hardener Parts ÷ Sum of Both Parts)
For example, at a 2:1 ratio with 600 ml total:
- Resin = 600 × (2 ÷ 3) = 400 ml
- Hardener = 600 × (1 ÷ 3) = 200 ml
Or — and I know this sounds like a sales pitch, but I genuinely use these myself — skip the math and let our calculators do it:
- Circle resin calculator — round molds
- Rectangle resin calculator — rectangular molds
- Square resin calculator — square molds
- Cylinder resin calculator — tall cylindrical molds
- Oval resin calculator — oval-shaped molds
- Hexagon resin calculator — hexagonal molds
- Hollow cylinder resin calculator — bangles, rings, tubes
Enter your dimensions, select your ratio, and get the exact Part A and Part B volumes instantly. No mental math, no rounding errors.
Final Thought
Your resin’s mixing ratio is the single most important number in the entire project. Everything else — open time, clarity, hardness, scratch resistance — flows from getting this one thing right. I learned that the hard way with a ruined river table and about $80 worth of wasted resin.
Measure precisely. Mix thoroughly. And when that little voice in your head says “eh, close enough” — ignore it. The chemistry doesn’t do “close enough.”