How Long Does Epoxy Resin Take to Cure? A Complete Timing Guide
Learn exactly how long epoxy resin takes to cure through every stage — from open time to full hardness. Covers temperature, humidity, layer thickness, and resin type factors with a handy cure-time reference table.
I’ll be honest — the first time I poured epoxy resin, I stood over the mold for a solid hour wondering is this thing ever going to harden? Then I made the classic beginner mistake: I poked it. Left a perfect fingerprint frozen in the surface forever. Lesson learned the hard way.
Cure time is probably the most-asked question in resin crafting, and the frustrating answer is “it depends.” It depends on the resin you bought, how thick you poured it, and whether your workspace is warm enough. But after working through dozens of projects — and ruining a few along the way — I’ve got a pretty solid handle on what to expect and when.
This guide breaks down the curing process into four stages, walks through every factor that speeds things up or slows them down, and gives you a reference table you can bookmark for next time.

The Four Stages of Epoxy Resin Curing
Here’s something that took me a while to really understand: curing isn’t a light switch. It’s not liquid one minute and rock-hard the next. It’s an exothermic cross-linking reaction that unfolds over hours and days, and each stage behaves differently. Knowing where you are in the process saves you from a lot of “why did I touch that” moments.
1. Open Time (Working Time)
Open time is your window to actually do things. It’s the gap between mixing your resin and hardener and the moment the mixture starts getting thick and uncooperative. During this phase the resin flows freely, self-levels, and lets you pop surface bubbles with a torch or heat gun.
- Coating resin (thin pours): 20 to 40 minutes
- Casting resin (deep pours): 40 to 80 minutes
- Fast-set craft resin: 5 to 15 minutes
This is the only time you can add inclusions, swirl colors, or adjust anything in the mold. I learned this the hard way with a set of coasters — I tried to reposition some dried flowers about 45 minutes into a coating resin pour. The resin had already started gelling and I just dragged streaks through the whole thing. Once open time is over, hands off.
2. Gel Stage (Tacky Stage)
After open time ends, the resin goes from liquid to something like warm gelatin. Thick, tacky, not quite solid. You cannot pour a fresh layer on top during this stage because the new liquid won’t bond properly to the partially cured surface underneath. Trust me on this one — I tried it once and ended up with a visible seam line that no amount of sanding could fix.
- Typical duration: 4 to 12 hours after mixing
- What you can do: Honestly? Nothing productive. Walk away. Watch a movie. The best thing you can do for your piece at this stage is leave it completely alone. Every touch leaves permanent marks.
If you need to add a second layer, you’ve got two options: pour it while the first layer is still in open time, or wait until it passes fully through the gel stage and reaches demold.
3. Demold Stage (Initial Cure)
This is the stage where you can finally breathe a little. The resin is hard enough to pop out of the mold without warping, but it’s not at full hardness yet. If you press your fingernail in firmly, you might still leave a slight dent. You can sand edges, trim off flash, and do light shaping work.
- Coating resin: 12 to 24 hours
- Casting resin: 24 to 48 hours
- Fast-set craft resin: 6 to 12 hours
Here’s a tip I wish someone had told me earlier — this is actually the ideal moment to add a second coat. The surface is firm but still chemically active enough to form a strong inter-coat bond without sanding between layers. Wait too long and you’ll need to scuff the surface first.
4. Full Cure
Full cure is when the chemical reaction between resin and hardener is completely finished. The piece reaches its maximum hardness, scratch resistance, and chemical resistance. Even though the surface might feel hard before this point, internally the resin is still reacting.
- Coating resin: 72 hours (3 days)
- Casting resin: 5 to 7 days
- Fast-set craft resin: 24 to 48 hours
I’ve ruined more pieces to impatience at this stage than I care to admit. One river table I demolded at 36 hours looked perfect — until I set a coffee mug on it the next morning and came back to find a perfect ring dent. It wasn’t fully cured yet. Now I mark the full-cure date on a sticky note and force myself to wait.
Do not place heavy objects on the surface, use the piece as a functional coaster, or set hot drinks on it until you’ve hit the full cure mark.
Factors That Affect Cure Time
Two people using the exact same bottle of resin can get wildly different cure times. I’ve seen it happen in workshops — one person’s piece cures beautifully in 24 hours while another’s is still tacky after two days. The difference usually comes down to these five things.
Temperature
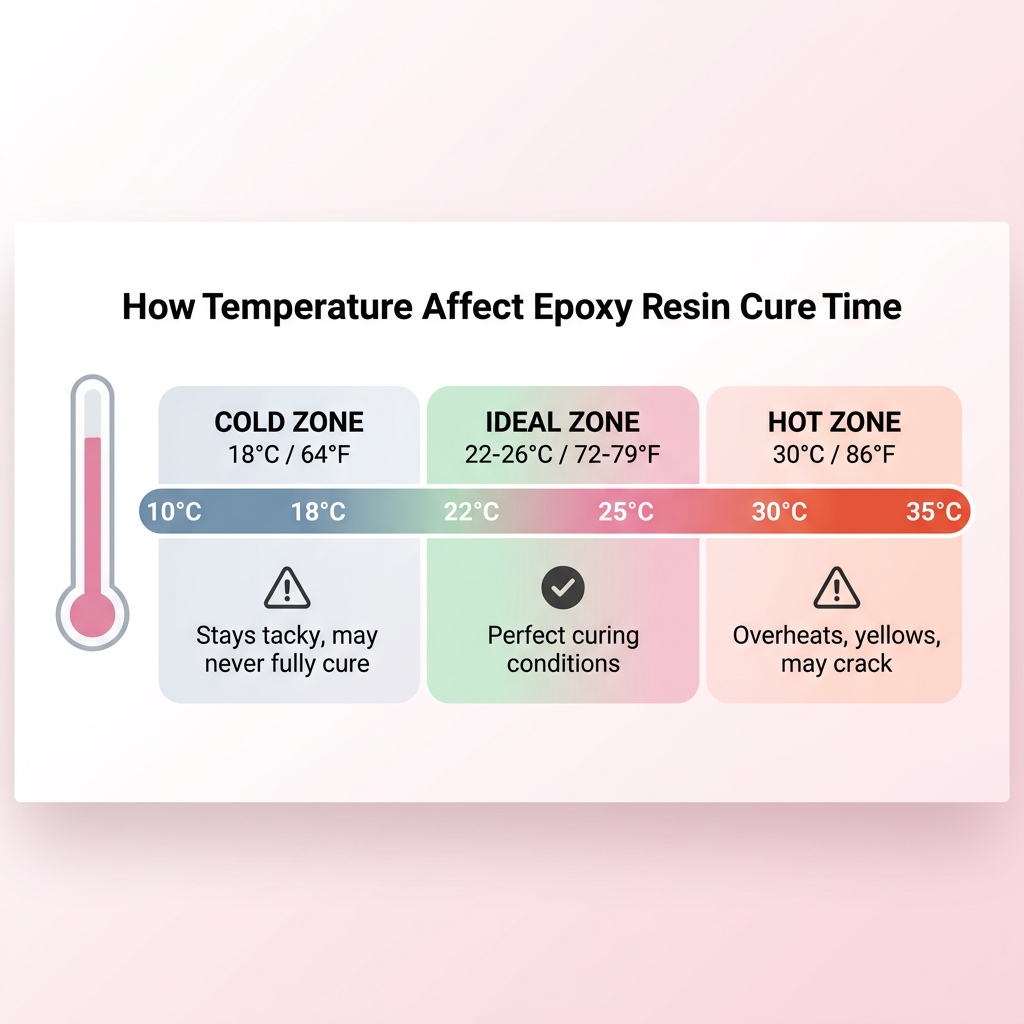
Temperature is the big one. It matters more than anything else on this list. Epoxy curing is an exothermic reaction — the resin generates its own heat as it cures, and warmth from the environment accelerates the whole process. According to West System’s epoxy technical guide, a 10°C increase in temperature can roughly halve the cure time, while a 10°C decrease can double it.
- Ideal range: 22 °C to 26 °C (72 °F to 79 °F)
- Below 18 °C (64 °F): Cure slows dramatically. The resin may stay tacky for days or never fully harden at all.
- Above 30 °C (86 °F): Cure accelerates too fast, which shortens your working time and can cause the resin to overheat in thick pours — leading to yellowing, cracking, or a scary runaway exothermic reaction.
In my workshop I keep a cheap digital thermometer clipped to the shelf right next to the curing area. If the room drops below 20 °C, I run a small space heater for an hour before mixing and keep it going for the first 24 hours. It makes a massive difference.
One more trick that’s saved me in cold weather: pre-warm your resin bottles in a warm water bath (not hot — about 30 °C) for 10 minutes before mixing. Warm resin flows better, mixes more thoroughly, and kicks off the reaction at a better starting temperature.
Humidity
High humidity introduces moisture onto the resin surface during open time. This can cause amine blush — a waxy, cloudy film that forms on the cured surface. It doesn’t usually slow the cure itself, but it absolutely wrecks the finish.
- Ideal humidity: Below 50% relative humidity
- Above 70%: Risk of amine blush goes up significantly
If you’re working in a humid climate (I’ve dealt with this during summer months), work in an air-conditioned room and consider running a dehumidifier nearby. Even pointing a fan across the surface during open time can help.
Layer Thickness
This one catches a lot of beginners off guard. Thicker pours generate more heat internally because the exothermic reaction has less surface area to dissipate that heat through. So thick layers actually cure faster in the center — but that extra heat can cause serious problems.
- Coating resin is designed for thin layers of 3 to 6 mm. Pour it thicker than that and you’re asking for cracking, yellowing, or weird fish-eye effects.
- Casting resin is chemically formulated for deep pours of 2 to 5 cm per layer. It uses less hardener proportionally, which generates less heat per unit of volume — that’s how it handles thick pours without overheating.
If your project calls for a deep pour, always reach for casting resin. I made the mistake of trying to pour coating resin 3 cm deep once. Within an hour the center was so hot I could feel it radiating warmth from a foot away. The piece cracked straight through the middle overnight.
You can use our rectangle resin calculator or cylinder resin calculator to figure out the exact volume before you pour — getting the amount right means the exothermic reaction stays controlled.
Resin Type
Different formulations have different cure schedules built into their chemistry. Here’s a quick comparison:
| Resin Type | Typical Open Time | Demold Time | Full Cure |
|---|---|---|---|
| Standard coating resin | 25 – 40 min | 16 – 24 hrs | 72 hrs |
| Fast-set craft resin | 5 – 15 min | 6 – 12 hrs | 24 – 48 hrs |
| Deep-pour casting resin | 40 – 80 min | 24 – 48 hrs | 5 – 7 days |
| UV resin | Unlimited (no hardener) | 2 – 5 min under UV | 5 – 10 min under UV |
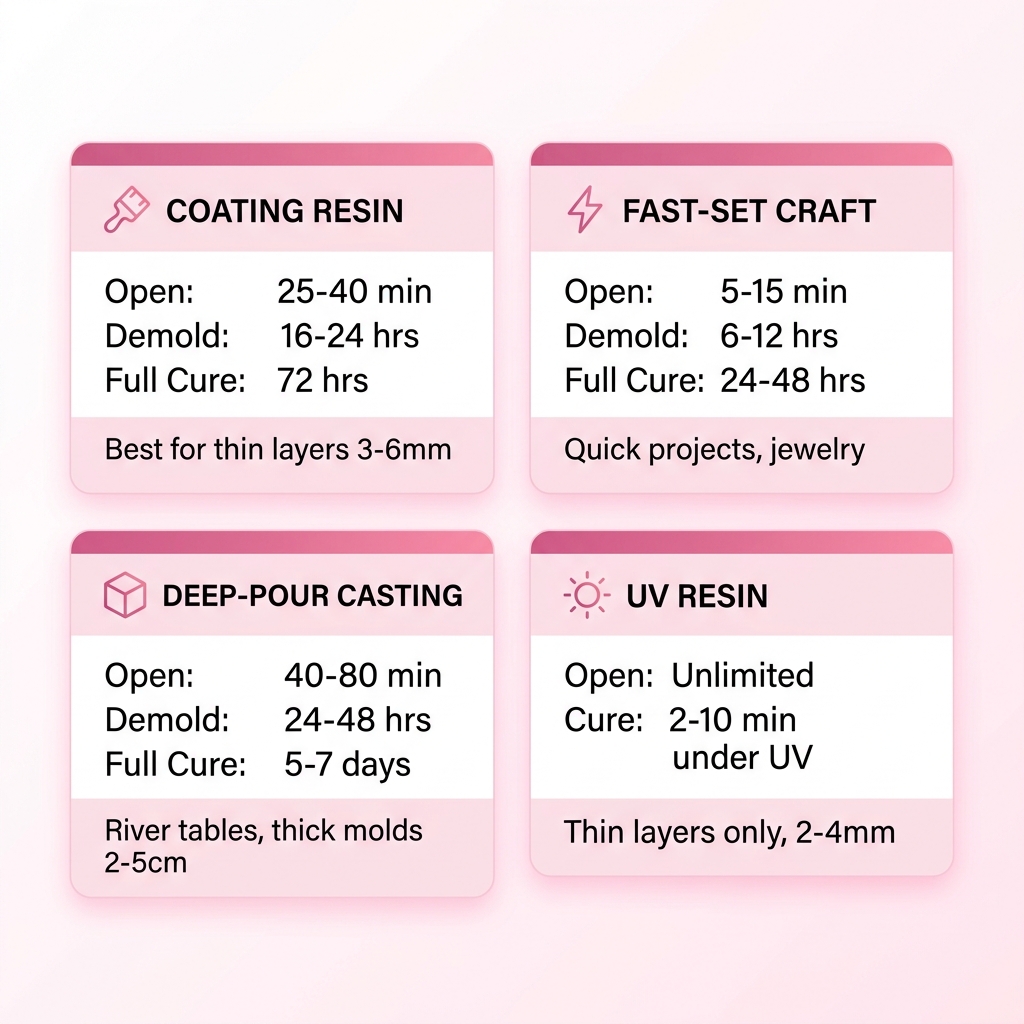
UV resin is the odd one out — it doesn’t cure through a two-part chemical reaction at all. It’s a single-component resin that hardens under ultraviolet light. Crazy fast, but you’re limited to very thin layers of 2 to 4 mm. Great for jewelry and small crafts, but you’re not making a river table with it.
Mix Ratio Accuracy
The ratio between resin and hardener isn’t a suggestion — it’s the stoichiometric formula for the chemical reaction. Every molecule of resin needs a specific number of hardener molecules to react with. Mess up the ratio and you get leftover molecules that never react, leaving you with a piece that stays permanently soft, sticky, or cloudy. Most manufacturers publish these specifications in their technical data sheets — for example, Entropy Resins’ TDS documents spell out exact ratios, pot life, and cure schedules for every product.
- 1:1 ratio resins are the most forgiving — small measurement errors get diluted across equal volumes.
- 2:1 and 3:1 ratio resins are pickier. Even a 5% error in the hardener amount can noticeably affect cure quality.
I always measure by weight, not by volume. A kitchen scale accurate to 1 gram is like $15 and it’s the best investment I’ve made for resin work. Our homepage resin calculator can split the total volume into Part A and Part B based on your exact ratio, so you don’t have to do the math in your head.
Cure-Time Quick Reference Table
| Factor | Speeds Up Cure | Slows Down Cure |
|---|---|---|
| Temperature | Warmer room (24 – 28 °C) | Cold room (below 18 °C) |
| Layer thickness | Thinner pours | Thicker pours (for coating resin) |
| Resin type | Fast-set / UV resin | Deep-pour casting resin |
| Mixing accuracy | Correct ratio | Incorrect ratio (may prevent full cure) |
| Humidity | Low humidity | High humidity (surface issues) |
How to Tell If Your Resin Is Fully Cured
I don’t trust the clock alone — every workspace is different, and manufacturer timelines assume ideal conditions. Instead, I run these three quick checks before I call a piece “done”:
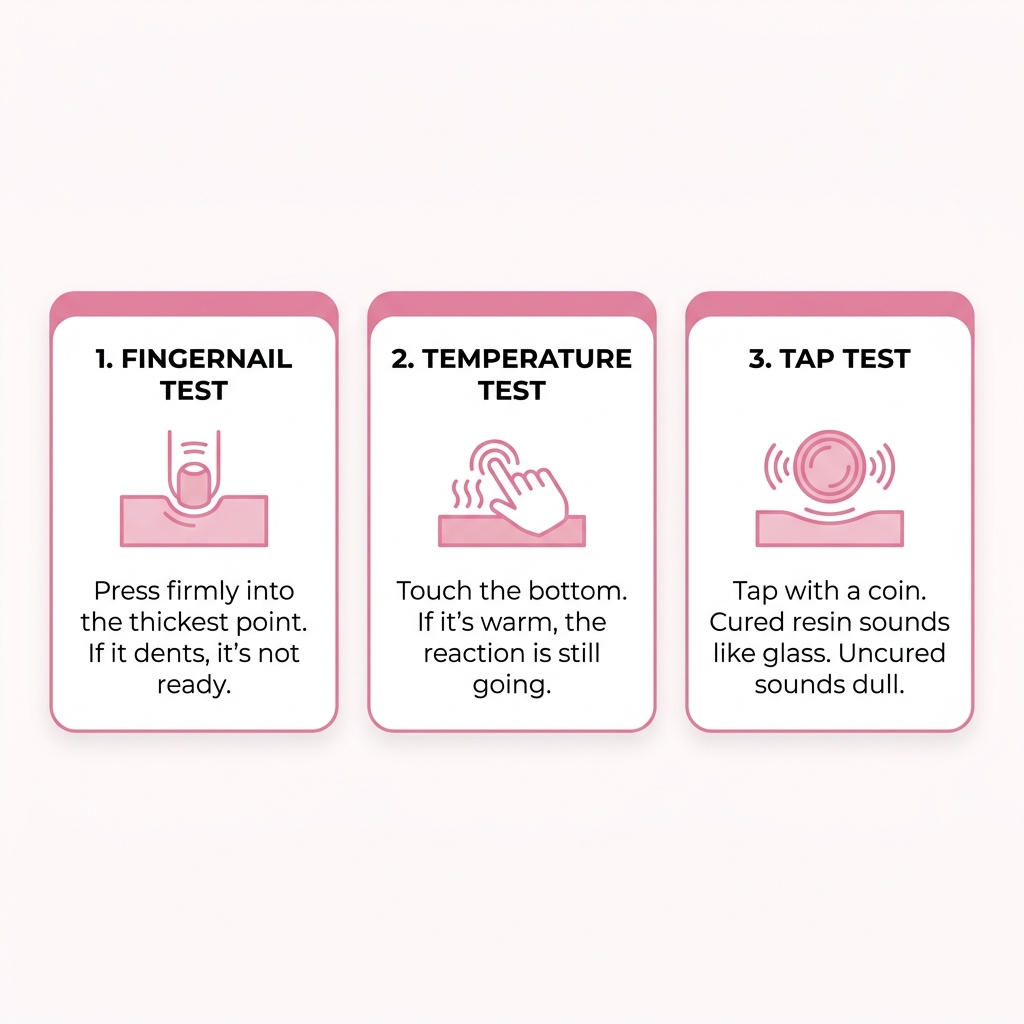
- Fingernail test. Press your fingernail firmly into the surface at the thickest point. If it leaves any kind of dent — even a faint one — it needs more time. A fully cured surface won’t budge.
- Temperature test. Touch the back or bottom of the piece. If it still feels even slightly warm, the exothermic reaction is still going. Wait until it matches room temperature.
- Tap test. This is my favorite. Tap the surface with a coin or pen cap. Fully cured resin makes a sharp, glassy clink. Under-cured resin sounds dull and flat — almost like tapping plastic. Once you hear the difference, you’ll never forget it.
Tips for Consistent Curing
These are things I do on every single pour now. They took me a while to figure out, but they’ve basically eliminated cure problems from my workflow:
- Pre-warm your resin bottles. Warm water bath, about 30 °C, 10 minutes. Don’t skip this in cooler months. The difference in flow and mixing quality is noticeable.
- Use a timer. I start one on my phone the moment resin and hardener touch each other. It sounds obsessive, but knowing exactly where you are in the open time window prevents so many mistakes.
- Cover your piece. I flip a large plastic storage bin upside down over the curing piece. Keeps out dust, cat hair, and the occasional curious insect. Just make sure there’s a little gap at the bottom for air circulation.
- Mix thoroughly. Scrape the sides and bottom of your mixing cup. Unmixed resin hiding in the corners is the number-one cause of sticky spots. I mix for at least 3 minutes — slowly and deliberately, not whipping in air bubbles.
- Keep a log. This is something I started doing after my third failed pour. Just a simple notebook entry: room temperature, humidity, resin brand, pour thickness, and the result. When something goes wrong (or goes perfectly), you can look back and figure out why.
Planning Your Pour With the Right Volume
Knowing your cure schedule is great, but knowing the right amount to mix matters just as much. Mix too much and you’ve got wasted resin sitting in a cup generating unnecessary heat. Mix too little and you need a second pour — which adds another day or more of curing time.
Use our shape-specific calculators to nail the volume on the first try:
- Round coasters and clock faces → Circle resin calculator
- Rectangular trays and tabletops → Rectangle resin calculator
- Cylindrical molds like vases → Cylinder resin calculator
- Square coasters and tiles → Square resin calculator
Getting the volume right means you mix exactly what you need, the exothermic reaction stays in the safe zone, and your cure time falls within the expected range. Less waste, fewer surprises.
Final Takeaway
Epoxy resin curing takes roughly 24 to 72 hours to reach a usable state, and up to 7 days for full hardness with deep-pour casting resins. But the single most critical factor is temperature — keep your workspace between 22 °C and 26 °C and you’ll get reliable results almost every time.
The hardest part of resin work isn’t the mixing or the pouring. It’s the waiting. But every time I’ve tried to rush it, I’ve paid for it with a dented surface, a sticky patch, or a cracked piece. Patience really is the cheapest tool in the workshop.