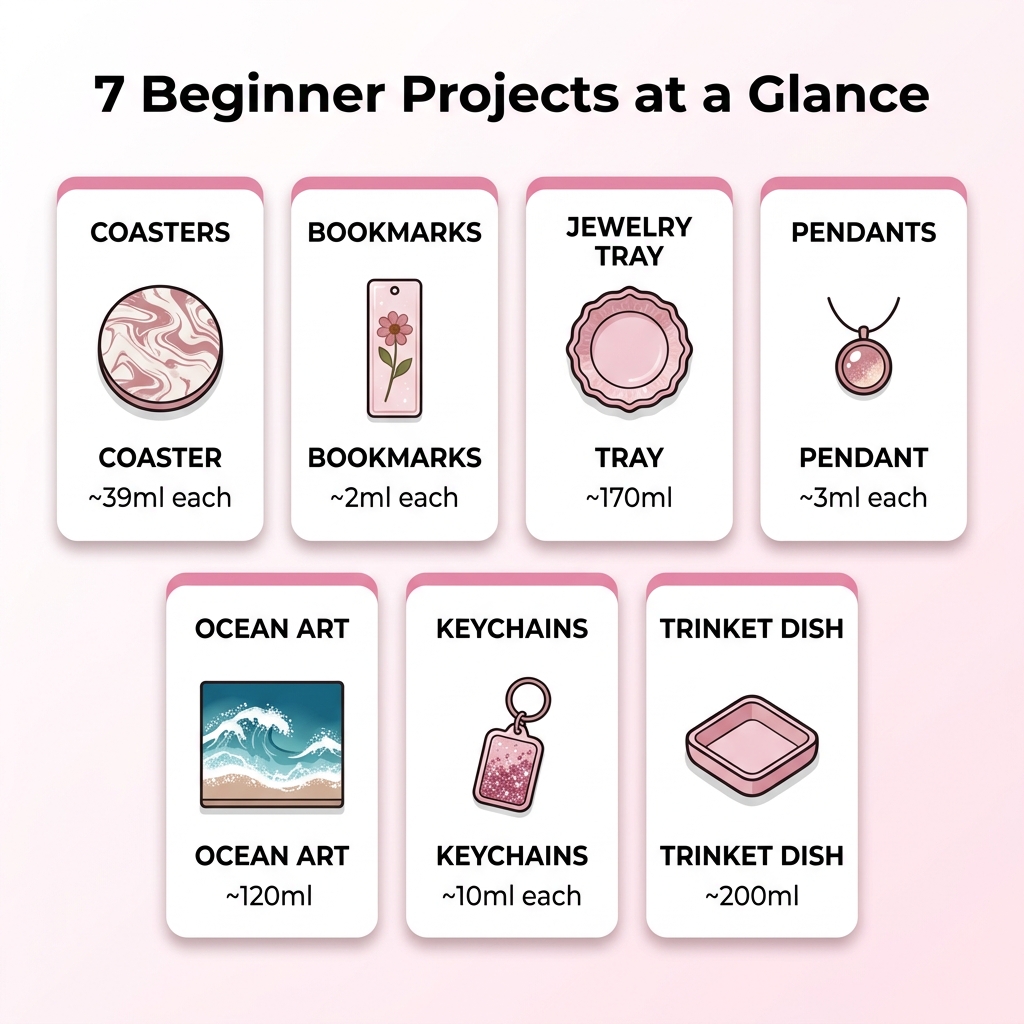
7 Beginner-Friendly Resin Art Project Ideas (With Approximate Resin Amounts)
Looking for your first resin project? Here are 7 easy resin art ideas for beginners — coasters, bookmarks, jewelry trays, pendants, ocean art, keychains, and trinket dishes — with approximate sizes and resin volumes.
I remember staring at my first bottle of epoxy resin for about three days before I actually opened it. There were so many things I didn’t know — what mold to use, how much to mix, what “pot life” even meant — that starting felt paralysing. Then a friend told me something that changed my approach entirely: “Just make coasters. Everyone starts with coasters.”
So I did. And they were terrible. Uneven, full of bubbles, and the colors looked muddy because I mixed too many pigments. But here’s the thing — they cured. I had made something solid and tangible, and suddenly the next project didn’t feel so intimidating.
If you’re in that “staring at the bottle” phase right now, this guide is for you. These seven projects are genuinely beginner-friendly — small, affordable, and forgiving enough that even a messy first attempt usually comes out looking decent. Each one includes the approximate dimensions and resin amounts so you know exactly what you’re getting into before you commit.
1. Resin Coasters (Set of 4)
Coasters are the most popular first resin project for good reason. They’re small, use minimal resin, cure quickly, and make genuinely useful gifts. Plus, the round shape is incredibly forgiving — even my sloppy first attempts looked surprisingly nice once they caught the light.
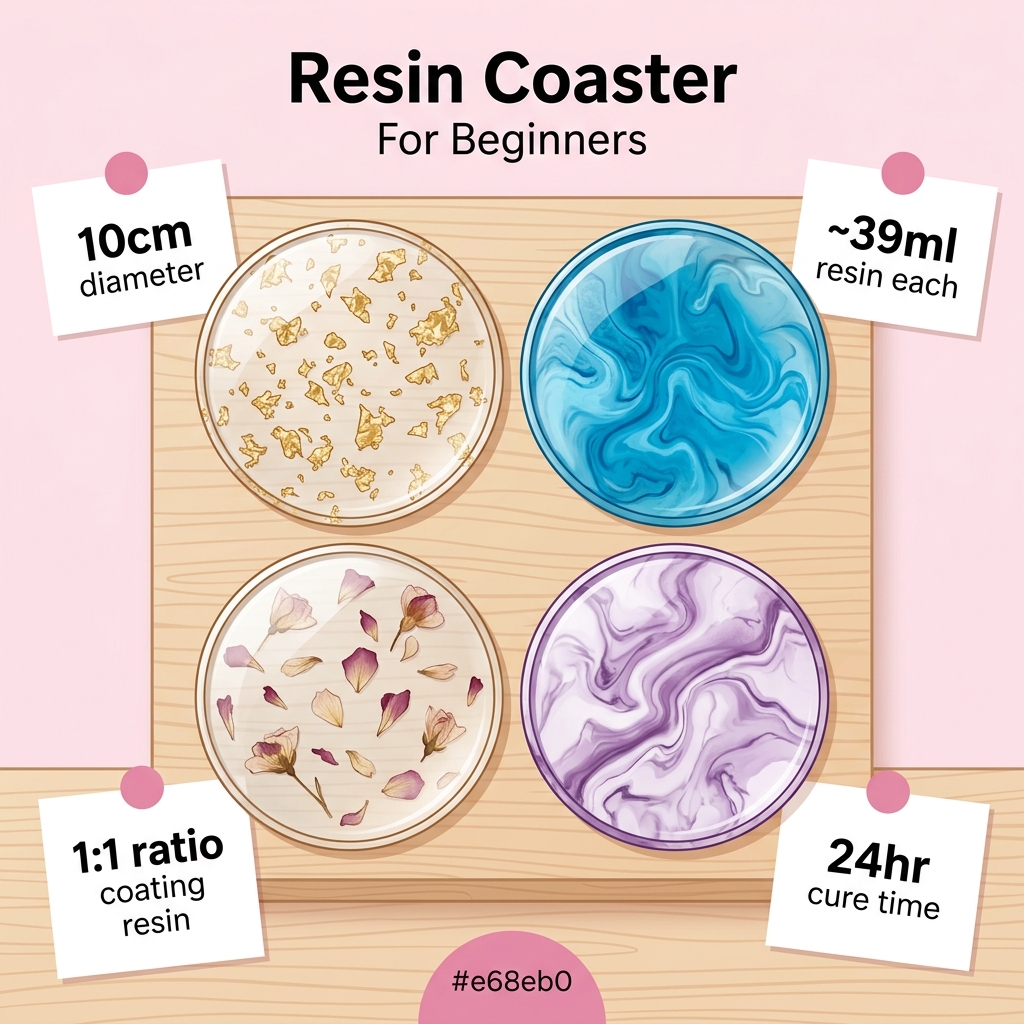
Typical Dimensions
- Shape: Circle
- Diameter: 10 cm (4 inches)
- Depth: 0.5 to 0.8 cm
- Resin per coaster: Approximately 39 to 63 ml
- Resin for a set of 4: Approximately 156 to 252 ml (plus 10% waste)
What You Need
- 4 silicone coaster molds (round)
- Epoxy resin and hardener (1:1 ratio coating resin works perfectly — check the product’s technical data sheet if you’re unsure about the ratio)
- Mica powder pigments or alcohol inks for color
- Optional: dried flowers, gold leaf, or glitter for inclusions
Tips From My Experience
- Start with a single color. I know the marbled multi-color pours look amazing on Instagram, but for your very first attempt, mix one pigment into the resin and just focus on getting a smooth, bubble-free pour. You can get fancy on coaster number five.
- Less pigment than you think. I overloaded my first batch with mica powder and the resin turned opaque and chalky. Start with a tiny amount — like the tip of a toothpick — and add more gradually.
- Pop those bubbles. A quick pass with a heat gun or small butane torch 6 inches above the surface works wonders. Keep it moving — holding it in one spot too long can scorch the resin.
- Let the coasters cure in the mold for at least 24 hours before demolding. I know the temptation to peek is enormous. Resist it.
Calculate exact amounts → Circle resin calculator
2. Resin Bookmarks
Bookmarks are an underrated beginner project that nobody talks about enough. They use almost no resin, the rectangular shape is easy to work with, and a set of custom resin bookmarks makes a genuinely thoughtful gift for any reader in your life.
Typical Dimensions
- Shape: Rectangle
- Length: 15 cm (6 inches)
- Width: 4 cm (1.5 inches)
- Depth: 0.3 to 0.5 cm
- Resin per bookmark: Approximately 1.8 to 3 ml
Yes — that’s a tiny amount of resin per bookmark. This is why they’re such a low-risk beginner project. If you mess one up, you’ve lost maybe a teaspoon of material. Mix a batch of about 30 to 50 ml and pour a set of 8 to 10 bookmarks at once to make the most of your open time.
What You Need
- Silicone bookmark molds (available in packs with varied shapes — some have tapered ends, some have rounded corners)
- Epoxy resin (1:1 coating resin)
- Pigments, glitter, or dried flower petals
- A small hole punch and tassels for finishing
Tips From My Experience
- Because the molds are so shallow, any inclusions need to be thin. I tried embedding a dried rose in one and it stuck out above the surface like a little bump. Pressed flowers and thin foil work much better than anything chunky.
- Use a toothpick to position small items within the mold. Your fingers are too clumsy for this scale of work, even with gloves.
- After demolding, drill or punch a small hole near the top and thread a ribbon or tassel through. This is the step that takes bookmarks from “neat resin rectangle” to “this looks like something you’d buy at a boutique.”
Calculate exact amounts → Rectangle resin calculator
3. Jewelry Tray or Ring Dish
A small jewelry tray is a step up from coasters in visual impact but still very manageable. These sit on dressers and nightstands holding rings, earrings, and bracelets — and they make the kind of gift people actually use every single day.
Typical Dimensions
- Shape: Circle, oval, or rectangle (depending on your mold)
- Diameter or length: 10 to 15 cm
- Depth: 1 to 2 cm
- Resin needed: Approximately 80 to 350 ml depending on shape and depth
What You Need
- A jewelry tray silicone mold (there are gorgeous options with scalloped edges, geode shapes, and irregular organic forms)
- Epoxy resin (1:1 coating resin or thin casting resin)
- Metallic pigments — gold, rose gold, and champagne look absolutely stunning in trays
- Optional: a small bottle of resin dye for a translucent tinted base
Tips From My Experience
- For a luxurious two-tone look, pour a thin white or nude-colored base layer, let it reach the tacky stage (about 4 to 6 hours), then pour a transparent or lightly tinted top layer with gold flakes scattered on top. This creates depth that catches the light beautifully.
- The decorative edges on fancy molds tend to trap bubbles in the corners. I use a toothpick to push resin into tight spots and release trapped air. Tedious? A little. Worth it? Absolutely.
- I’ve given these as housewarming and birthday gifts and people always think I bought them at a high-end boutique. That’s the magic of resin — even a beginner can make something that looks expensive.
Calculate exact amounts → Circle resin calculator for round trays, Oval resin calculator for oval trays, or Rectangle resin calculator for rectangular trays.
4. Photo or Keepsake Pendants
Resin pendants that encapsulate a tiny photo, a pressed flower, or a meaningful small object are deeply personal pieces. They require almost no resin and can be made in an afternoon. I made one with a tiny photo of my grandmother’s handwriting and it’s one of my favourite things I’ve ever crafted.
Typical Dimensions
- Shape: Circle or oval
- Diameter: 2.5 to 3 cm (1 inch)
- Depth: 0.5 cm
- Resin per pendant: Approximately 2 to 4 ml
What You Need
- Small pendant molds (often sold in sets with different shapes — circles, ovals, hearts, teardrops)
- Epoxy resin (1:1 coating resin)
- A printed photo, scaled and trimmed to fit the mold
- Jewelry findings: bail, jump ring, chain
Tips From My Experience
- Seal your photo first. This is the tip that saves the whole project. Spray the printed photo with a thin coat of clear acrylic sealer and let it dry completely before embedding it. Without sealing, the resin soaks into the paper and turns the image blurry or semi-transparent. I ruined my first three pendants before learning this.
- Pour a thin base layer (1 to 2 mm) first, let it gel for about 4 hours, then place the photo face-down and fill the remaining depth with a second pour. This sandwiches the photo between two clear layers.
- Pendants use so little resin that you’ll inevitably have leftovers. Don’t waste it — pour the excess into spare molds. I usually have a few keychain or bookmark molds standing by as “overflow catchers.”
Calculate exact amounts → Circle resin calculator or Oval resin calculator
5. Ocean-Themed Resin Art Panel
This is the project that got me hooked on resin art permanently. Ocean art is one of the most visually stunning things you can make, and here’s the secret that nobody tells you — the technique is more forgiving than it looks. Those beautiful flowing waves and lacy cell patterns? The resin creates those itself. You just guide the colors and let gravity and chemistry handle the rest.
Typical Dimensions
- Shape: Rectangle (canvas or wood panel)
- Length: 30 cm (12 inches)
- Width: 20 cm (8 inches)
- Depth: 0.2 to 0.3 cm (thin coating)
- Resin needed: Approximately 120 to 180 ml
What You Need
- A wood panel or canvas board (pre-sealed with acrylic paint or gesso)
- Epoxy resin (1:1 coating resin)
- Resin pigments: white (for waves), 2 to 3 shades of blue and teal, transparent for the deep water areas
- A heat gun (essential for creating the wave cell pattern)
Technique Overview
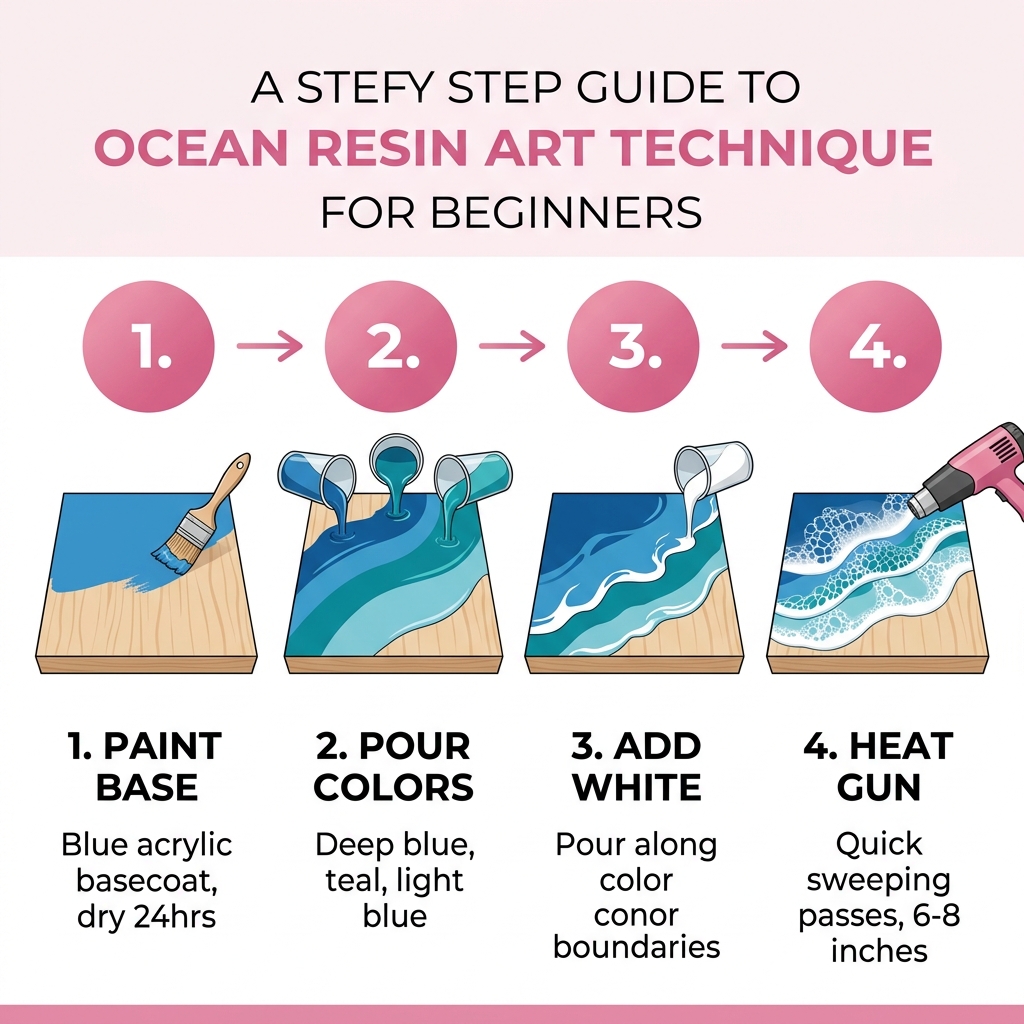
- Pre-paint the panel with a blue acrylic basecoat and let it dry fully (24 hours).
- Mix separate cups of resin: deep blue, teal, light blue, white.
- Pour the blue shades across the panel in organic curved bands.
- Tilt the panel to let the colors flow and blend at the edges.
- Pour white resin along the boundary between the blue colors to create wave crests.
- Use a heat gun at a low angle across the white resin. The heat creates cells that look like ocean foam.
Tips From My Experience
- Practice the heat gun on a test piece first. Seriously. My first ocean panel has a scorched spot in one corner where I held the heat gun too close for too long. Quick, sweeping passes at 6 to 8 inches distance — that’s the sweet spot.
- Elevate the panel on cups or small stands so excess resin drips cleanly off the edges. Put a drop cloth underneath because it will drip.
- Work fast. Ocean art depends on the resin being fluid, so you need to complete the entire pour and heat gun work within your open time. I’d recommend a resin with at least 35-40 minutes of working time.
Calculate exact amounts → Rectangle resin calculator
6. Resin Keychains
Keychains are tiny, fast, and incredibly fun to batch-produce. They’re ideal for craft fairs, party favors, stocking stuffers, or just making twenty of them in one session because you can’t stop. I may have spent an entire Saturday making glitter keychains once. No regrets.
Typical Dimensions
- Shape: Various (rectangle, circle, heart, hexagon, custom)
- Length: 5 cm (2 inches)
- Width: 3 cm (1.2 inches)
- Depth: 0.6 to 0.8 cm
- Resin per keychain: Approximately 9 to 12 ml
What You Need
- Keychain silicone molds (often sold in big packs with 10+ cavities — great value)
- Epoxy resin (1:1 coating resin)
- Keychain hardware: split rings and small eye screws or bail caps
- Glitter, foil flakes, tiny charms, or letter beads for customization
Tips From My Experience
- Because each keychain uses so little resin, mix one batch and pour multiple keychains at the same time. A 100 ml batch fills 8 to 10 keychain molds easily, and you use your open time much more efficiently.
- Embed the hardware. Press the eye screw into the resin while it’s still liquid so the hardware cures directly into the piece. This creates a dramatically stronger attachment than gluing hardware on after curing. I had a glued-on eye screw pop off in someone’s pocket once — switched to embedding after that.
- A small amount of chunky glitter or opaque pigment makes keychains feel more substantial despite their thin profile. Clear keychains look nice but feel a bit flimsy.
Calculate exact amounts → Rectangle resin calculator for rectangular keychains, Circle resin calculator for round ones, or Heart shape resin calculator for heart-shaped keychains.
7. Small Trinket Dishes
A trinket dish is basically a bigger, deeper coaster, and they’re incredibly satisfying to make. These hold keys, coins, earbuds, or whatever small items accumulate on your nightstand. They’re also the project where you start to feel like “okay, I actually know what I’m doing now.”
Typical Dimensions
- Shape: Square, circle, or hexagon
- Side or diameter: 8 to 12 cm
- Depth: 1.5 to 2.5 cm
- Resin needed: Approximately 75 to 235 ml depending on shape and depth
What You Need
- Trinket dish silicone mold (many decorative options with irregular edges or geode-inspired shapes)
- Epoxy resin (1:1 coating resin or thin casting resin for deeper molds — West System’s guide explains why thicker pours need different formulations)
- Pigments, alcohol inks, metallic powders
- Optional: crushed glass, crystal chips, or natural stones for texture
Tips From My Experience
- For a geode-inspired look: pour a thin base layer in a dark color — black, navy, or deep purple. Before it fully gels, sprinkle crushed glass or crystal chips along one edge. After the base cures, pour a clear or lightly tinted top layer. The depth effect is gorgeous.
- Watch the depth. Trinket dishes are deeper than coasters, which means the exothermic reaction generates more heat. If your mold is deeper than 1.5 cm, either use a casting resin or pour your coating resin in two thin layers with 4 to 6 hours between pours. I learned this when a deep pour got so hot it warped my mold.
- These make exceptional housewarming gifts. I customize the color palette to match the recipient’s decor — neutral tones with gold accents for minimalist spaces, deep jewel tones for bolder ones.
Calculate exact amounts → Square resin calculator for square dishes, Circle resin calculator for round dishes, or Hexagon resin calculator for hexagonal dishes.
Resin Amounts at a Glance
| Project | Shape | Approx. Size | Depth | Resin per Unit |
|---|---|---|---|---|
| Coaster | Circle | 10 cm diameter | 0.5 cm | ~39 ml |
| Bookmark | Rectangle | 15 × 4 cm | 0.3 cm | ~1.8 ml |
| Jewelry tray | Circle | 12 cm diameter | 1.5 cm | ~170 ml |
| Photo pendant | Circle | 2.5 cm diameter | 0.5 cm | ~2.5 ml |
| Ocean art panel | Rectangle | 30 × 20 cm | 0.2 cm | ~120 ml |
| Keychain | Rectangle | 5 × 3 cm | 0.8 cm | ~12 ml |
| Trinket dish | Square | 10 × 10 cm | 2 cm | ~200 ml |
These are approximate starting points. For exact amounts tailored to your specific mold dimensions and mixing ratio, use the shape-specific calculators linked throughout this article.
Getting Started: What to Buy First
If you’re brand new to resin and want to try one project this weekend, here’s the minimum shopping list. Don’t let anyone convince you that you need a $200 starter kit — you really don’t.
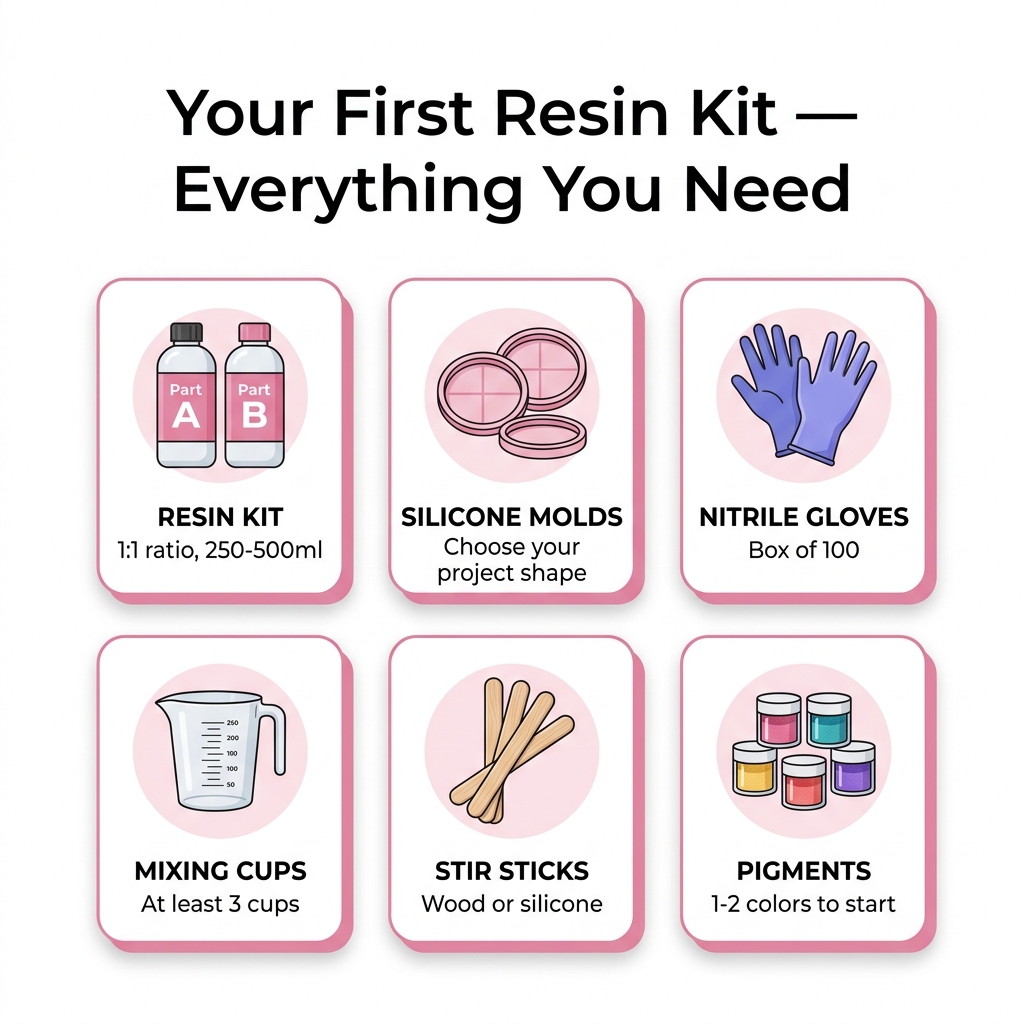
- A small epoxy resin kit (1:1 ratio, 250 to 500 ml total). This is enough for a set of 4 coasters or about 20 keychains.
- Silicone molds for your chosen project.
- Nitrile gloves (a box of 100 — about $12 and lasts dozens of sessions). Seriously, don’t skip these. Read our epoxy resin safety guide if you want to understand why — skin sensitization is real and it’s permanent.
- Mixing cups (graduated, at least 3).
- Stir sticks (wood craft sticks or silicone stir rods).
- 1 to 2 mica powder pigments in colors you like.
That’s it. Skip the expensive pigment collections, specialty tools, and bulk resin orders until you know you enjoy the craft. My first successful set of coasters cost me about $35 in total supplies, and I had enough material left over for a second batch.
Start small, learn the process, and scale up from there. And use the resin calculator to take the guesswork out of your first pour — knowing exactly how much to mix makes everything less stressful.